3.10. Clipping Box
The clipping box allows you to cut off all tissues outside it. To build a box, click on the Clipping
Box  button on the toolbar by clicking the left/right/middle mouse button. To continue work
with this tool, use the button with which the tool was activated. To learn more about tool control, see
Section 1.14.
button on the toolbar by clicking the left/right/middle mouse button. To continue work
with this tool, use the button with which the tool was activated. To learn more about tool control, see
Section 1.14.
To build a minimum box not cutting the model, click on the arrow on the Clipping Box button and select the Fit to model command.
To build a box by the image borders, click on the arrow on the Clipping Box button and select the Reset clipping box command.
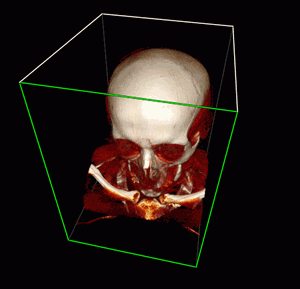
To cut off parts of tissues, move the box face so that it intersects the 3D model. To do this, locate the cursor on the box face so that its borders are highlighted in green (Fig. 3.9).
Next, move the face using the mouse while holding the left button. Only the faces located in the foreground (highlighted in white) can be moved. The faces unavailable for moving are highlighted in grey. To be able to work with the faces that are unavailable for moving, rotate the image. The box is rotated synchronously with the image.
To zoom the box symmetrically, move the mouse, holding the mouse button with which the tool was activated and Ctrl key (or the Command key for macOS).
To pan the box, move the mouse, holding the mouse button with which the tool was activated and Shift key.
To rotate the box, move the mouse, holding the mouse button with which the tool was activated and Alt key (or the Option key for macOS).
If the Clipping Box tool is deactivated, the sections made using the tool will be saved. To restore the initial look of the model, use one of the following options:
-
Activate the Clipping Box tool and move the faces to make the model visible.
-
Click on the arrow on the Clipping Box button and select any of the building options. If the Clipping Box tool is inactive, the box will not be visualized, but the section will still be reset.
This tool is also available from the Volume main menu item.