2.28. Export Images
2.28.1 Export to DICOM
The export to DICOM allows you to export images to a series that is available while the current study is open. To export:
-
Click on the arrow on the Quick export images
 button on the toolbar and select
the Export images... item or press Ctrl+E key (or the Command+E key for macOS).
button on the toolbar and select
the Export images... item or press Ctrl+E key (or the Command+E key for macOS).
-
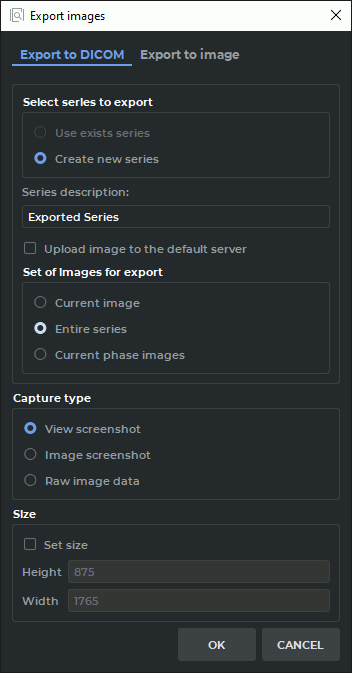
Select the Export to DICOM tab. The export window will look as shown in Fig. 2.87.
-
Select the series to export. If no series has been exported yet, only the Create new series item will be available. If an export has been conducted before, you can export the data to the last created series by selecting the Use exists series option.
-
If you need to load the exported images to the DICOM server immediately, check the option Upload image to the default server. If the default server is not set in the DICOM Viewer this option will be inactive.
-
Select a set of images for export. Three options are available:
-
Current image;
-
Entire series;
-
Current phase images (only for multiphase series).
-
-
Select the capture type. Three options are available:
-
View screenshot: the entire view window workspace is captured, including the image information without conversions performed by the user;
-
Image screenshot: only the image visible in the workspace (with conversions performed by the user) is captured;
-
Raw image data: the whole image is captured; of all the user’s conversions, only mirroring is taken into account.
-
-
Set the image size if necessary.
-
To initiate export, click OK. To cancel the export, click CANCEL.
To continue exporting images to the DICOM format with the current settings, click on the Quick
export images button or press F5.
This tool is also available from the Image main menu item.
The results of image export to a DICOM series are affected by the filter applied (see Section 2.6).
 | An image to which a filter has been applied is not original, and the measurement results may be inaccurate. |
2.28.2 Export to Image
The export to image allows you to export the current image to a .png or .jpg file. To export data to an image:
-
Click on the arrow on the Quick export images
button on the toolbar and
select the Export images button or press Ctrl+E key (or the Command+E key for
macOS).
-
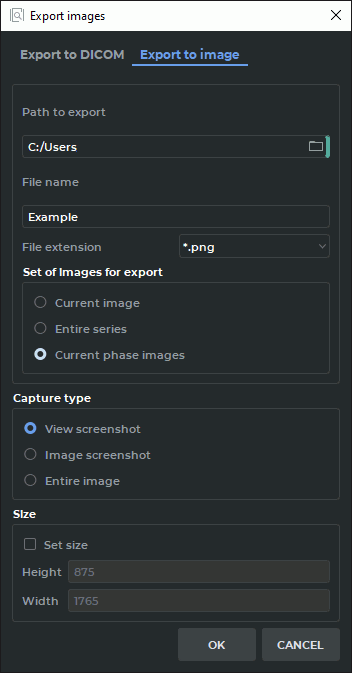
Select the Export to image tab. The export window will look as shown in Fig. 2.88.
-
Set the path to the folder for export by entering it into the Path to export field or click the
 button and select the path in the dialog box.
-
Enter the file name.
-
Select the file extension from the drop-down menu.
-
Select a set of images for export. Three options are available:
-
Current image;
-
Entire series;
-
Current phase images (only for multiphase series).
-
-
Select the capture type. Three options are available:
-
capture view area: the entire view window workspace is captured, including the image information and background;
-
capture visible image: only the image visible in the workspace is captured (scale-sensitive);
-
all image: only the image is captured, irrespective of scale.
-
-
Set the image size if necessary.
-
To initiate export, click OK. To cancel the export, click CANCEL.
To continue exporting images to a file with the current settings, click on the Quick export
images button or press F5. The file names will be specified automatically. If you attempt to
export the same image twice, the DICOM Viewer will return the "File with the same name
already exists. Do you want to overwrite it?" warning. To overwrite the image, click YES. To
cancel, click NO.
This tool is also available from the Image main menu item.
The results of image export to a file are affected by the filter applied (see Section 2.6).
| | An image to which a filter has been applied is not original, and the measurement results may be inaccurate. |