19.2. Edit print list in Preview window
19.2.1 Preview
The Preview windows are intended to control the printing and final editing of the print list. The Preview window is used to view printing on paper and save images to a pdf file, the DICOM Preview is used for printing on film. To open the target window, select the File menu and the Preview item or the DICOM Preview item. The settings made in one window do not affect the settings in the other one except deleting images. The print list is common for both windows, hence, the images deleted in one of the windows are deleted from the print list, and they disappear in the other window.
The DICOM Preview tab is shown in Fig. 19.1.

The toolbar is located at the top (Fig. 19.2), and the bottom part shows what the printed images will look like (preview page).

The toolbar contains the following elements:
 | The Update button refreshes the preview page after the print list has been changed |
 | The Fit width button adjusts the preview page size to the screen width |
 | The Fit page button adjusts the preview page size to the tab size |
 | The
Page
scale
field.
The
scale
is
entered
from
the
keyboard
manually
or
selected
from
the
dropdown
menu.
To
open
the
dropdown
menu,
click
on
the
arrow
 on
the
right
side
of
the
panel
on
the
right
side
of
the
panel |
 | The Zoom in button zooms in the page. The current scale is displayed in the Page scale field |
 | The Zoom out button zooms out the page. The current scale is displayed in the Page scale field |
 | The Portrait button sets the portrait layout for the page |
 | The Landscape button sets the landscape layout for the page |
 | The First page button is used to jump to the first page if the images do not fit into a single page |
 | The Previous page button is used to jump to the previous page if the images do not fit into a single page |
 | Page input field. It shows the current page and the total number of pages. To go to the page you need, print its number and press the Enter key on the keyboard |
 | The Next page button is used to jump to the next page if the images do not fit into a single page |
 | The Last page button is used to jump to the Last page if the images do not fit into a single page |
 | Page template drop-down list. It allows to select a predefined page template (see Section 19.2.2) |
 | The Edit page template button opens the Page Template Settings dialog (see Section 19.2.2) |
 | The Resolution (DPI) drop-down list (only for the Preview window). The list allows to set print resolution (clarity) |
 | The Printer dropdown menu (only for the DICOM Preview window). It specifies the DICOM printer |
 | The Zoom tool allows to zoom selected images |
 | The Pan tool allows to shift selected images inside cells |
 | The Reset transformation tool allows to reset all the transformations made using the Zoom and Pan tools |
 | The Adjust W/L tool allows to change the window width and level |
| | The Arrow tool allows to make graphic labels such as arrows. For details on how to do it see Section 2.33 |
 | The Pencil tool allows to build freeform contours. For details on how to do, it see Section 2.33 |
 | The Text tool allows to make text labels. For details on how to do, it see Section 2.33 |
 | The Ellipse tool allows to make graphic labels such as an ellipse. For details, on how to do it see Section 2.33 |
 | The Rectangle tool allows to make graphic labels such as an rectangle. For details, on how to do it see Section 2.33 |
 | The Polygon tool allows to make graphic labels such as a polygon. For details, on how to do it see Section 2.33 |
 | The Remove all annotations tool removes all annotations from the image. For details, on how to do it see Section 2.19.13 |
 | The Show labels tool allows to show the information about an image. For details, on how to do it see Section 19.2.4 |
 | The Show reference image tool allows to display a reference image. For details, on how to do it see Section 19.2.5 |
 | The Remove selected images button allows to remove selected images from the print list (see Section 19.2.3) |
 | The Page setup (only for the Preview window) opens the print settings dialog |
 | The Print button opens the print dialog |
| | The Clear print list command removes all the images from the print list. To use it, click the arrow on the Print button and select the Clear print list item |
 | The Export to PDF tool (only for the Preview window) saves images to a pdf file |
19.2.2 Set Up Page Templates
The Page templates tool allows you to arrange images in arbitrary order. After the program has been installed, the following templates will be available:
-
one image on the screen;
-
two images, one on top of the other;
-
2x2 grid;
-
3x2 grid.
To open the page template editing dialog, click the Edit page template button. The
dialog box for the print preview window is shown in Fig. 19.3. For the DICOM preview tab, in the
dialog box, instead of the Spacing parameter you will see a drop-down menu for choosing the film
size.
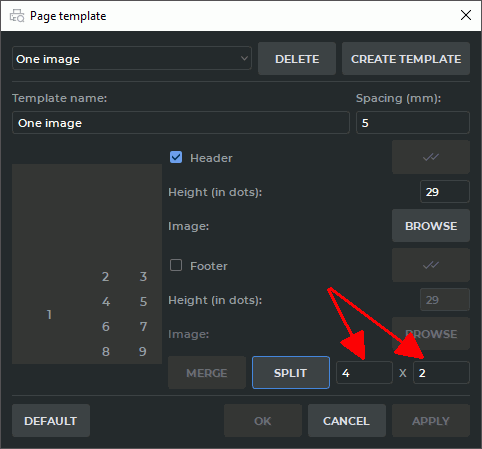
Select the desired template from the drop-down list. To add a new template, click the CREATE TEMPLATE button, to delete a template, click the DELETE button.
 | Attention! Deleting a template cannot be undone. |
To change a template name, enter a new name in the Template Name field.
For the Preview tab set the space between images in the Spacing (mm) field.
For the DICOM preview tab, choose the film size from the “Film size” drop-down menu. The default value is Chosen film size for printer. If this value is chosen, the size of the film will be as set for your printer. The DICOM printer settings are described in Section 19.3.2. If you choose a different value for the printing template, the size provided for by the printer settings will be ignored.
On the left-hand side of the window you see the arrangement of images on the page. To divide any cell into any number of lines and columns, left-click on that cell to select it and enter the required number of lines and columns in the left and the right fields indicated by the arrows in Fig. 19.3. Then click SPLIT.
If the column and/or row count is greater than 1, you can merge an arbitrary number of cells. The merged cells must form a rectangle. For example, set the Row count to 3 and the Column count to 4. Next, select cells 7, 8, 11, 12. To do it, move the cursor from cell 7 to cell 12, holding the left mouse button. Next, click MERGE. The four selected cells will be merged.
To split any cell into an arbitrary number of rows and columns, select this cell, enter values in the rows and columns fields and click the SPLIT button. The cells made by splitting can only be merged with each other.
The cells created in such a way can only be merged with other cells from the same group.
To add the header and/or the footer, proceed as follows:
-
Check the Header box to add the header and the Footer box to add the footer. The header and the footer will be shown in the scheme representing the cell arrangement.
-
Specify the header/footer height in points.
-
Choose an image for the header/footer. To do that, click the BROWSE button and choose a file with jpg, jpeg, jpe or png extension in the dialog box that pops up.
-
To use this header/footer for all the templates without a header/footer (including the new templates by default), click the Set this header as default
 or Set this
footer as default button in the dialog box. Then click YES to apply or NO to
cancel.
or Set this
footer as default button in the dialog box. Then click YES to apply or NO to
cancel.
To save the changes, click OK or APPLY, to cancel, click CANCEL.
19.2.3 Cells
If the page template contains several cells, then to apply the Zoom, Pan, Adjust W/L tools to several images on one page or to delete an image (images), you need to select the corresponding cells. To select, click the left mouse button on the cell. To remove a selection, click on the image again. To select multiple cells:
-
To select multiple cells that are contiguous (next to each other): click on the first cell and click on the last one, holding the Shift key on the keyboard.
-
To select multiple cells that are anywhere on the page: click the left mouse button on each one, holding the Ctrl key (or the Command key for macOS) on the keyboard.
-
To remove a selection, click on the any selected cell again.
| | Warning! If any of the graphic label tools or one of the "Zoom", "Pan", "Adjust W/L" tools is active, selection and removing of the selection are not available. |
To remove the images in the selected cells click the  Remove selected images
button.
Remove selected images
button.
To swap images in cells, drag an image to the target cell, holding the left mouse button. The images will be swapped.
19.2.4 Print Labels
If an image is captured without labels, you can add them in the Preview Window. To do it, click the
Show labels button. The tags that should be displayed are marked with flags. To display or
hide a label, click the arrow on the right side on the Show labels button and select the target
item.
To set the font size, select the Show annotation text size... item in the button menu.
To select the DICOM tags that should be displayed in the left-hand bottom corner, select the Set visible tags... item in the button menu and in the dialog that appears mark the target tags with flags.
If one or more cells are selected, the settings will be applied only to these cells.
19.2.5 Reference image
The DICOM Viewer provides an opportunity to add reference images to the print list. You can ascribe the same reference image to all the images on the list, or a different image to each of the images on the list. To ascribe several reference images to each study added to the print list, you can create a separate list of reference images.
To add a reference image:
-
Choose an image from the same study that has been added to the print list. Click the arrow on the Add to print list
 button and select the Add as reference image
item. This image will by default be ascribed to all the images from the same study included
in the print list.
button and select the Add as reference image
item. This image will by default be ascribed to all the images from the same study included
in the print list.
-
If you need to add a new reference image to the list or replace it with a different one, repeat the previous step. You will see a notification that a reference image has already been added. To add another reference image to the list, click the YES button; to replace the previous reference image, click the REWRITE buton, to cancel, click the NO button.
-
Open the Preview or DICOM Preview window. If the Show reference image
tool
is inactive, activate it with the left mouse button. A reduced reference image is displayed
in the corner of each image. If there is more than one image on the list of reference images,
the first image added to the list will be displayed.
-
To adjust the display of the reference image, click the arrow on the Show reference image
button and select the Reference image settings... item. You can set up the following
properties:
-
image alignment;
-
dimention ration;
-
project line width (mm).
-
-
To replace the reference image attributed to a separate image, highlight it and click the arrow on the Show Reference Image
button, then click the Select Reference Image...
button. Choose the image you need in the dialog box and click CHOOSE. If no image has been
selected, the reference image will be changed for all the images on the print list. If there are
images from different studies on the print list, the reference image can be changed only for the
images selected. The Select Reference Image... function is also available in the right-click
menu.
-
To delete a reference image from the list, click the arrow on the Show Reference Image
button, then click Select Reference Image... item. Choose the image you need in the dialog
box and click the DELETE button.
-
To hide/show a reference image, click the Show Reference Image
button. If there are
some images selected, the action will be performed only for them.
If there are images from different studies on the print list, reference images will be ascribed to them separately.