4.4. Image registration
____________________________________________________________________________________________
Functionality is available in the Pro edition
____________________________________________________________________________________________
 | This function cannot be used for establishing a diagnosis |
This tools allows you to deform the images so that their coincidence is maximal. If the inconsistencies of the series are too large (for example, the patient turned), you must first merge the layers manually or automatically (see Section 4.3) and then register the images.
Images can be registered for:
-
series with the same modality;
-
phases of one series.
If a study contains images with a varying density over time (for example, due to the introduction of contrast), then registration may not be performed correctly. To do this, exclude the tissue with varying density.
-
Set the maximum value of the density for which registration is performed. In this case, the tissues with a density higher than the specified value do not participate in the registration, and their deformation is performed according to another algorithm.
-
Check the Use image gradient in the Series registration settings dialog. This mode requires a large amount of video card memory. If the registration failed due to a lack of video card memory of the video card, turn off this mode or select a CPU(software) render device (see Section 16.7.3).
If the images contain air outside the patient’s body, then the density of such areas for CT examinations is usually less than or equal to -1024. It makes no sense to register these sections of images. Hence, for CT studies, the default minimum density value is -1023.
If the registration failed due to a lack of video card memory, select a CPU(Software) render device (see Section 16.7.3). In this case, the registration takes more time, but it is performed regardless of the amount of GPU memory.
4.4.1 Series registration
____________________________________________________________________________________________
Functionality is available in the Pro edition
____________________________________________________________________________________________
To register two series:
-
Create a fused series of at least two series.
-
Open the fused series in the Multiplanar Reconstruction window.
-
If the inconsistencies between the series are too large (for example, the patient turned over), you must first merge the layers manually or automatically (see Section 4.3). More accurate merging of layers enables faster registration.
-
Open the segmentation panel by clicking the Segmented structure panel
 button.
-
Select a base layer on the layers panel (fixed layer). Its images will not be changed.
-
Click the Volumes registration
 button. The dialog shown in Fig. 4.10 appears.
If more than two series are fused, then the list from which you must select one series for
registration (Choose moving seris layer).
button. The dialog shown in Fig. 4.10 appears.
If more than two series are fused, then the list from which you must select one series for
registration (Choose moving seris layer).
-
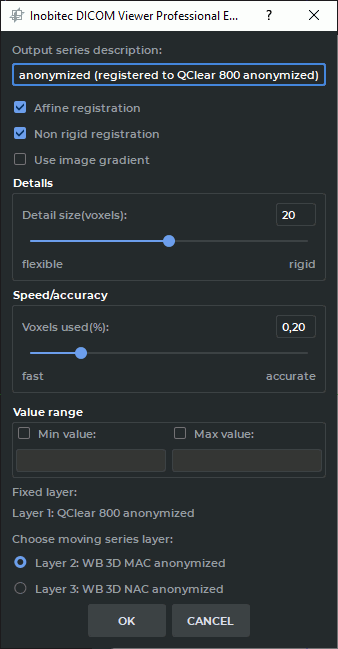
The Output series description field will be automatically filled in based on the name of the series being registered, and it will contain the "registered" mark. If necessary, change the description.
-
Select the desired registration options, checking the Affine registration, Non rigid registration and Use image gradient boxes.
-
Set the minimum size of the parts that will affect registration. The default size is 20 voxels. The smaller the value is, the more minor details are registered, but the risk of incorrect registration increases.
-
Set the percentage of voxels that are used during the registration. The larger the value is, the higher the accuracy is, but the lower the registration rate gets.
-
If it is necessary to perform registration for a specific range of densities, then set the minimum and/or maximum values. To do this, set the appropriate flag and enter a numeric value. If the flag is set, but the value is not set, then the OK button is unavailable. For CT series, the minimum default value is -1023.
-
Click OK to export the series or CANCEL to cancel. Registration may take a long time depending on the amount of RAM and the speed of the computer.
4.4.2 Phases registration
____________________________________________________________________________________________
Functionality is available in the Pro edition
____________________________________________________________________________________________
To register the phases of one series:
-
Open the multiphase series in the Multiplanar or Volume Reconstruction window.
-
Open the segmentation panel by clicking the Segmented structure panel
button.
-
Click the Volumes registration
button. The dialog shown in Fig. 4.11 appears.
-
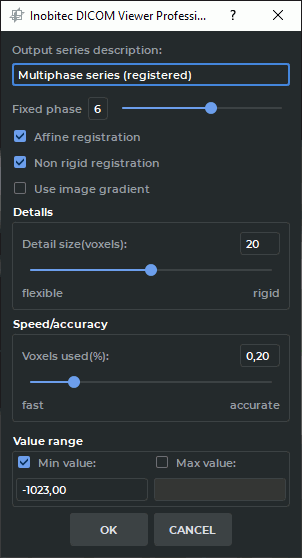
The Output series description field will be automatically filled in based on the name of the series being registered, and it will contain the "registered" mark. If necessary, change the description.
-
Select the base phase that should not be changed (fixed phase).
-
Select the desired registration options, checking the Affine registration, Non rigid registration and Use image gradient boxes.
-
Set the minimum size of the parts that will affect registration. The default size is 20 voxels. The smaller the value the more minor details are registered, but the risk of incorrect registration increases.
-
Set the percentage of voxels that are used during the registration. The larger the value is, the higher the accuracy is, but the lower the registration rate gets.
-
If it is necessary to perform registration for a specific range of densities, then set the minimum and/or maximum values. To do this, set the appropriate flag and enter a numeric value. If the flag is set, but the value is not set, then the OK button is unavailable. For CT series, the minimum default value is -1023.
-
Click OK to export the series or CANCEL to cancel. Registration may take a long time depending on the amount of RAM and the speed of the computer.