18.2. Working with Reports
____________________________________________________________________________________________
Functionality is available in the Pro edition
____________________________________________________________________________________________
The DICOM Viewer allows the user to create empty reports (see Section 18.2.1) and reports based on templates (see Section 18.2.2).
18.2.1 Creating an Empty Report
____________________________________________________________________________________________
Functionality is available in the Pro edition
____________________________________________________________________________________________
There are three ways to create a new report in the study list tab:
-
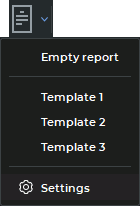
Select a study on the study panel. Select a study series on the series panel. Click the arrow on the Report
 button on the toolbar and select the Empty report option
on the drop-down menu (see Fig. 18.4).
button on the toolbar and select the Empty report option
on the drop-down menu (see Fig. 18.4).
-
Right-click on the series thumbnail and select Report->Empty report on the context menu.
-
Select a series thumbnail on the series panel. On the main menu, select View->Report->Empty report.
To create a new report in the Image viewer tab, select a series on the series panel. Then click the
arrow on the Report button on the toolbar and select the Empty report option on the
drop-down menu (see Fig. 18.4).
An empty report named Report is created. The heading for the report editor window is generated with the <Patient ID>,<Patient Name> values for the current study. You will find the information on creating reports on the basis of templates in Section 18.2.2.
18.2.2 Creating a Report Based on a Template
____________________________________________________________________________________________
Functionality is available in the Pro edition
____________________________________________________________________________________________
To create a report on the basis of a template, select a series thumbnail and click the arrow on the
Report button on the toolbar. On the drop-down menu that pops up (Fig. 18.4), select the
required template from the list. An editor window for reports based on templates will be displayed
on the screen. For details on templates (their creation, editing, saving, and export) see
Section 18.3.
To select a template that will be used by default when a report is created, click the arrow on the
Report button on the toolbar. On the drop-down menu, select Settings.
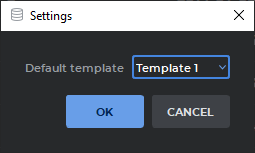
In the dialog box that pops up (Fig. 18.5), select the template to be used by default. Click OK to save or CANCEL to cancel.
Clicking on the left-hand side of the Report button afterwards will create a report based
on the template that was selected by default.
18.2.3 Saving a Report
____________________________________________________________________________________________
Functionality is available in the Pro edition
____________________________________________________________________________________________
If there are any unsaved changes in the report text or name, the heading of the report editor window will have an asterisk "*" symbol.
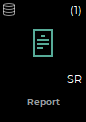
To save a report, click the SAVE  button on the editor toolbar. The report will be
saved as a special SR series in the current study. The name and description of the series
corresponds to the name of the report. If you click the SAVE button again, the changes
will be saved in the current SR series. A thumbnail for a series with a report is shown in
Fig. 18.6.
button on the editor toolbar. The report will be
saved as a special SR series in the current study. The name and description of the series
corresponds to the name of the report. If you click the SAVE button again, the changes
will be saved in the current SR series. A thumbnail for a series with a report is shown in
Fig. 18.6.
To create a new SR series with a report click the Save as  button on the editor toolbar. In
the dialog box that pops up, enter the name of the new report. By default, the name of
the current report or a transformed name of the current report (if the current name is
inadmissible) is shown in the dialog box. The work will be continued in the new SR-series
report.
button on the editor toolbar. In
the dialog box that pops up, enter the name of the new report. By default, the name of
the current report or a transformed name of the current report (if the current name is
inadmissible) is shown in the dialog box. The work will be continued in the new SR-series
report.
The name of the report is considered inadmissible if it is the same as the name of another report or if it contains inadmissible symbols (see Section 18.1.1). When the report is saved, the program automatically replaces inadmissible symbols in the file name with "_"; spaces in the beginning and dots in the end of the name are deleted. If there is a name conflict, a number in parentheses will be added to the name.
18.2.4 Exporting a Report
____________________________________________________________________________________________
Functionality is available in the Pro edition
____________________________________________________________________________________________
The DICOM Viewer provides an opportunity to export a report in a PDF file or a DICOM DOC series.
To export a report in a PDF file, click the Export  button on the editor toolbar and
select the Export to PDF file... option. In the dialog box that pops up, select the place
where you want to save the PDF file and enter the name of the file. The name of the
report is used as the file name by default. Click Save to save the PDF file or Cancel to
cancel.
button on the editor toolbar and
select the Export to PDF file... option. In the dialog box that pops up, select the place
where you want to save the PDF file and enter the name of the file. The name of the
report is used as the file name by default. Click Save to save the PDF file or Cancel to
cancel.
If the file name contains inadmissible symbols, an error message will pop up (see Section 18.1.1).
To export a report in a DICOM DOC series, click the Export button on the editor toolbar
and select the Export to DICOM DOC series option. The name of the report is considered
inadmissible if it is the same as the name of another report. If there is a name conflict, a number in
parentheses will be added to the name. A new DOC series is created as a result of export. This series
is saved in the current study.
18.2.5 Viewing and Editing a Report
____________________________________________________________________________________________
Functionality is available in the Pro edition
____________________________________________________________________________________________
There are several ways to open a created report for viewing or editing:
-
Double-click with the left mouse button on an SR series thumbnail on the series panel.
-
Select an SR series thumbnail and click the Report
button on the toolbar.
-
Drag an SR series thumbnail to the study list window.
-
Drag an SR series thumbnail to the flat image viewer window.
 | Attention! If a study or a series containing a report is located on a PACS server, then to view the report, you have to download the series or the study containing a report to the local storage. |
You can edit the report name and contents. Save the edited report (for details see Section 18.2.3).