19.3. Print Images on Film
19.3.1 Set Up DICOM Printers
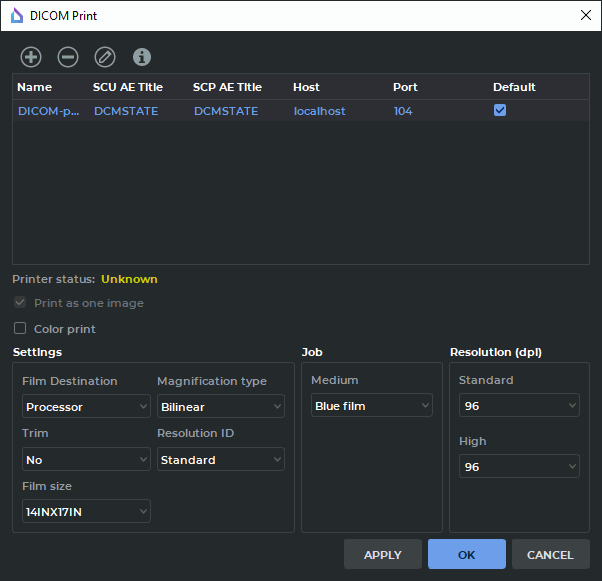
To set up the DICOM printing parameters, select the Network menu and the DICOM printer setup... item. The window shown in Fig. 19.4 will be displayed.
To add a DICOM printer to the list:
-
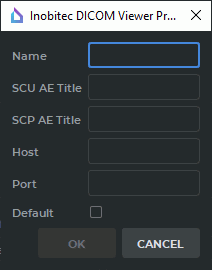
Click the Add printer
 button on the toolbar. The printer setup dialog box
(Fig. 19.5) will be displayed.
button on the toolbar. The printer setup dialog box
(Fig. 19.5) will be displayed.
-
Enter a user-defined printer name into the Name field.
-
In the SCU AE Title field, enter the name of the client allowed to access the printer (this parameter is defined in the printer settings).
-
In the SCP AE Title field, enter the printer name (this parameter is defined in the printer settings).
-
Enter the printer network address in the Host field.
-
Enter the printer port in the Port field.
-
Check the Default box if the printer should be used by default.
-
Click OK to apply the changes or CANCEL to cancel them. To save the information without closing the window, click APPLY.
All the added printers will appear on the printer list. The default printer can be assigned directly from the list by checking the box next to the printer.
To delete a printer from the list, select it and click the Remove printer  button. Click
YES in the confirmation dialog to delete the printer or NO to cancel the deletion.
button. Click
YES in the confirmation dialog to delete the printer or NO to cancel the deletion.
To edit the printer settings, select the printer and click the Edit printer  button.
To check whether a printer is available, select it and click the Info printer  button. If the
printer is available, the printer list will display the Online status for the printer. If not,
the Offline status will be displayed. If the status has not been checked, its value will be
Unknown.
button. If the
printer is available, the printer list will display the Online status for the printer. If not,
the Offline status will be displayed. If the status has not been checked, its value will be
Unknown.
19.3.2 Set Up DICOM Printing Parameters
To set up the DICOM printing parameters, select the Network menu and the DICOM Printer setup... item. The window shown in Fig. 19.4 will pop up.
 | The settings must be in strict compliance with the specification for the DICOM printer. |
Set the required parameters on the printing setup panel:
-
Set the film source (Unit or Processor).
-
Set the film cutting.
-
Set the magnification type. If you need to print the images with the original resolution, select None. If you need to fit the images to the film size, select one of the magnification types (Bilinear, Cubic or Replicated). In this case, the printer will change the image resolution according to the selected algorithm to maximize the image size on the page and retain its proportions.
-
Select the resolution to print the images (Standard or High). Set the print quality in DPI (dots per inch) for the options Standard and High.
-
Choose the film size from the Film size drop-down menu.
-
Choose the media type from the Medium drop-down menu.
-
Since version 1.11, you can not deactivate the Print as one image option.
-
If necessary, enable the printing of labels.
-
For color printing check the Color print box.
You can also specify the film size in the tab for setting the page templates. If the Chosen film size for printer parameter has been chosen, the size of the film will be as set for your printer. Otherwise, the size of the page template will be used (see Section 19.2.2).
19.3.3 Setting Up the Default DICOM Print Parameters
Certain makes of DICOM printers may not support some print parameters described in the DICOM standard. If a parameter passed to the printer is not supported, an attempt to print may fail. To prevent such errors, the DICOM Viewer provides for an opportunity not to specify certain parameters and not to pass them to the DICOM printer.
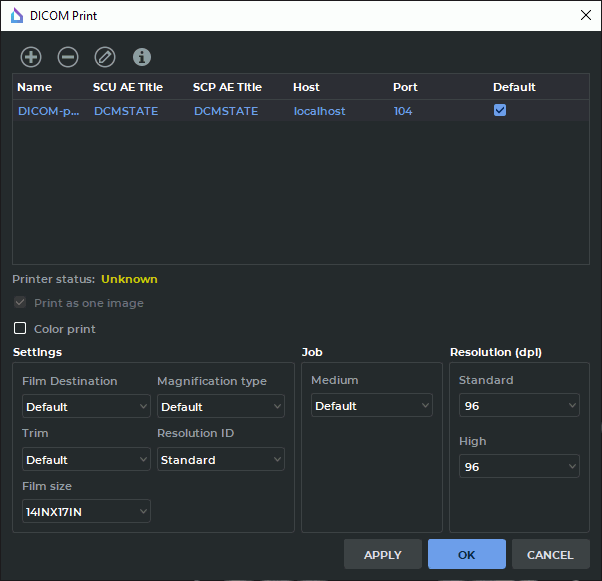
To set up the default DICOM printing parameters, select the Network menu and the DICOM Printer setup... item.
In the DICOM Print dialog box (Fig. 19.6), the user may choose Default values for the following parameters:
-
Film Destination;
-
Trim;
-
Magnification type;
-
Medium.
A Default value means that the value has not been specified and is to be determined by the DICOM printer.
The values for the Film size and Resolution (dpi) parameters must be chosen from the drop-down lists.
19.3.4 Print
You can print images on a DICOM printer from the DICOM preview window (see Section 19.2). To
open it select the File menu and the DICOM Preview item. To print images on a DICOM printer,
click the DICOM print  button on the toolbar. The window shown in Fig. 19.7 will be
displayed.
button on the toolbar. The window shown in Fig. 19.7 will be
displayed.

The parameters in the window correspond to the default parameters specified during the printing setup. Change these parameters if necessary and click the PRINT button to initiate the printing or CANCEL to cancel.
If the printer is not available the message like Pinter "PrinterName" is not available will be displayed.