9.2. PET Analysis Tab Elements
____________________________________________________________________________________________
Functionality is available in a separate module which is activated in the Pro edition for an extra fee
____________________________________________________________________________________________
9.2.1 PET Analysis tab Windows
____________________________________________________________________________________________
Functionality is available in a separate module which is activated in the Pro edition for an extra fee
____________________________________________________________________________________________
The PET analysis tab may contain 1-6 image viewing windows:
-
One window;
-
Two windows side by side;
-
2X2 grid;
-
2X3 grid.
The mode may be changed by pressing the respective button on the toolbar. The button will look different depending on the current mode:
 | 3D MIP mode. The mode may be switched to Mono PET |
 | Mono-PET mode. The mode may be switched to 3D MIP |
 | Mono-KT mode |
 | Fusion PET+KT mode. The mode may be switched to Mono CT |
To switch the mode, activate the respective window by left-clicking on it, click the mode button and choose the mode you need from the menu. The current mode is highlighted in blue. The procedure of setting the template for each mode is described in Section 9.2.2.
On the left, you can see the Series List panel showing all the series for the study. To open the required series in the PET Analysis window, drag it into the window. The MIP window may only be used for PET series, but you can drag PET, CT or fused series to other windows.
Double-click any of the four windows with the left mouse button to unfold it. Please, note that you shouldn‘t activate any of the measuring tools, annotation tools or the magnifier with the left mouse button.
9.2.2 Setting the templates for windows arrangement in the PET analysis tab
____________________________________________________________________________________________
Functionality is available in a separate module which is activated in the Pro edition for an extra fee
____________________________________________________________________________________________
To set the windows arrangement templates, click the mode selection button (  ,
,  ,
,  or
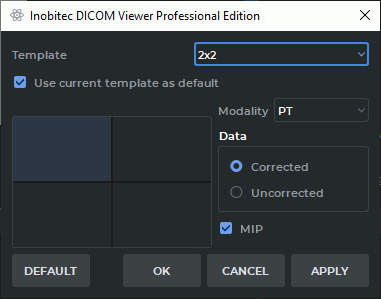
or  depending on the mode) and select Settings... A dialog box shown in Fig. 9.3 will pop
up.
Choose a template from the drop-down menu (One, Two near, 2x2, 2x3).
To use this template as default, tick the Use current template as default box.
To set a template window, select this window with the mouse. It will be highlighted (in Fig. 9.3 the upper left window is selected). Then proceed as follows:
-
Choose the modality from the drop-down menu (Unspecified, CT, PT or PT+CT). If the Unspecified modality has been chosen, the cell will be empty.
-
The DICOM Viewer allows you to open either only the corrected PET series or only those that haven’t been corrected. To choose the series to be opened, check either Corrected or Uncorrected in the Data box. The default value is Uncorrected. If a series does not comply with this parameter, it will not be shown.
-
Check the MIP box for the PET series to display the maximum intensity projection.
To restore the default settings for the current template, click the DEFAULT button. In the dialog box that pops up, click YES to restore the settings or NO to cancel. By default, the following template settings are provided:
-
One Template: PET+CT combination is shown.
-
Two near Template: 3D MIP for the corrected PET series in the left window, Fusion (PET+CT) — in the right window.
-
2x2 Template: from left to right, downwards: 3D MIP for the corrected PET series, corrected PET series, CT series, Fusion (PET+CT).
-
2x3 Template: from left to right, downwards: 3D MIP for the corrected PET series, corrected PET series, CT series, Fusion (PET+CT), two empty windows.
Click OK to apply the settings or CANCEL to cancel the operation.
The changes in the template do not affect the tabs that had been opened before such changes were introduced.

