17.3. Anonymize studies and series
Anonymization is possible only for the studies in the Local Storage or for those that are opened from a folder or from a CD.
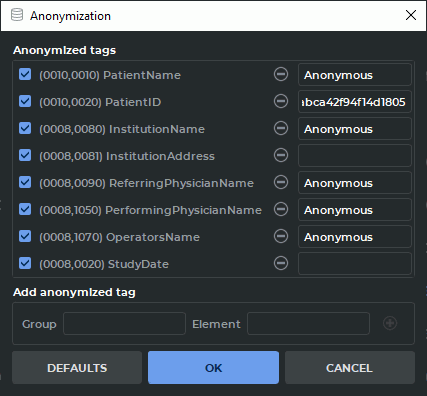
The DICOM Viewer 2.15 provides for an extended list of tags anonymized by default. If the list of tags was edited by a user of DICOM Viewer 2.14 or inferior, the new tags will not be added to the list of tags anonymized by default. The complete list of tags anonymized by default will be restored after the user click the DEFAULTS button in the Anonymization dialog box (Fig. 17.3) and performs the anonymization procedure. If required, you can edit the list of tags anonymized by default (the procedure is described below).
The data stored in the following tags will be replaced with Anonymous value or deleted:
-
(0010,0010) PatientName;
-
(0010,0030) PatientBirthDate;
-
(0010,0040) PatientSex;
-
(0010,1010) PatientAge;
-
(0008,0080) InstitutionName (institution or organization to which the identified individual is responsible or accountable);
-
(0008,0081) InstitutionAddress (mailing address of the institution or organization to which the identified individual is responsible or accountable);
-
(0008,0090) ReferringPhysicianName (name of the patient’s referring physician);
-
(0008,1050) PerformingPhysicianName (name of the physician(s) administering the Series);
-
(0008,1070) OperatorsName (name(s) of the operator(s) supporting the Series);
-
(0008, 1010) StationName;
-
(0018,1030) ProtocolName;
-
(0008,1090) ManufacturerModelName.
The (0010,0020) PatientID (patient’s identificator) tag value will be replaced with a random
alphanumeric value.
To anonymize values stored in other tags, you must add these tags to the list (see below).
 | For the (0008,0018) SOPInstanceUID and (0020,000e) SeriesInstanceUID tags, new values are generated by default when series are anonymized. If a study is anonymized, the value of the tag (0020,000d) StudyInstanceUID is additionally changed. |
To anonymize studies:
-
Select one or more studies in the Local Storage, a local folder or a CD.
-
Select the Studies menu and Create anonymized copies of the selected studies... The Anonymization dialog box (Fig. 17.3) pops up.
-
To add a tag to anonymize, type the group number to the Group field and type the element number to the Element field and click the
 button (Fig. 17.3).
-
To delete a tag to anonymize, click the
 button.
-
By default, the data stored in tags is replaced by "Anonymous". To change the text value of the tag, left-click on the respective field and enter the new value.
Warning! The format of the input data must comply with the DICOM standard. -
To disable tag anonymization without deleting the tag from the list, uncheck the box against the chosen tag. By default, the boxes for all the tags added to the anonymization list are checked.
-
To restore the default tag list, click the DEFAULTS button.
-
To Anonymize, click OK, to cancel click CANCEL.
If other tags contain data that matches the data contained in anonymized tags, the warning appears (Fig. 17.4).
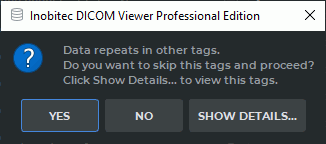
To view the tags containing the same data as the anonymized tags, click SHOW DETAILS.... To save the study without changing the tag data, click YES. To change the tag values, click NO and add the selected tags to the anonymization list.
The tags with the data that matches the data contained in the anonymized tags are automatically added to the Anonymization box (Figure 17.3). By default, the added tags are ticked. To anonymize the tags, click OK; to cancel, click CANCEL.
The selected studies will be anonymized and saved to the Local Storage with the patient‘s name Anonymous.
To anonymize the selected series:
-
Select study in the Local Storage, a local folder or a CD.
-
Select the series that you want to Anonymize. For details on how to work with series, see Section 1.10.
-
Select the Studies menu and Create anonymized copy of series...
-
To add a tag to anonymize, type the group number to the Group field and type the element number to the Element field and click the
button (Fig. 17.3).
-
To delete a tag to anonymize, click the
button.
-
By default, the data stored in tags is replaced by "Anonymous". To change the text value of the tag, left-click on the respective field and enter the new value.
Warning! The format of the input data must comply with the DICOM standard. -
To disable tag anonymization without deleting the tag from the list, uncheck the box against the chosen tag. By default, the boxes for all the tags added to the anonymization list are checked.
-
To restore the default tag list, click the DEFAULTS button.
-
To Anonymize, click OK, to cancel click CANCEL.
| | For the (0008,0018) SOPInstanceUID and (0020,000e) SeriesInstanceUID tags, new values are generated by default when series are anonymized. |
The selected series will be anonymized, saved to the Local Storage and marked anonymized.
 | Make sure that no personal data are retained in customized tags and that standard tags only have anonymized data. |