13.2. Set Up PACS Server Connection
In this window, you can set up the connections with the applications which can exchange data with the DICOM Viewer, using the DICOM protocol. In this case, the DICOM Viewer can take on the role of a PACS server and the other applications will be clients, and vice versa. Since most of the applications with which a connection can be established can take on the role of a PACS server, the connections with them are set up in this window, regardless of whether they will be servers or clients in relation to the DICOM Viewer.
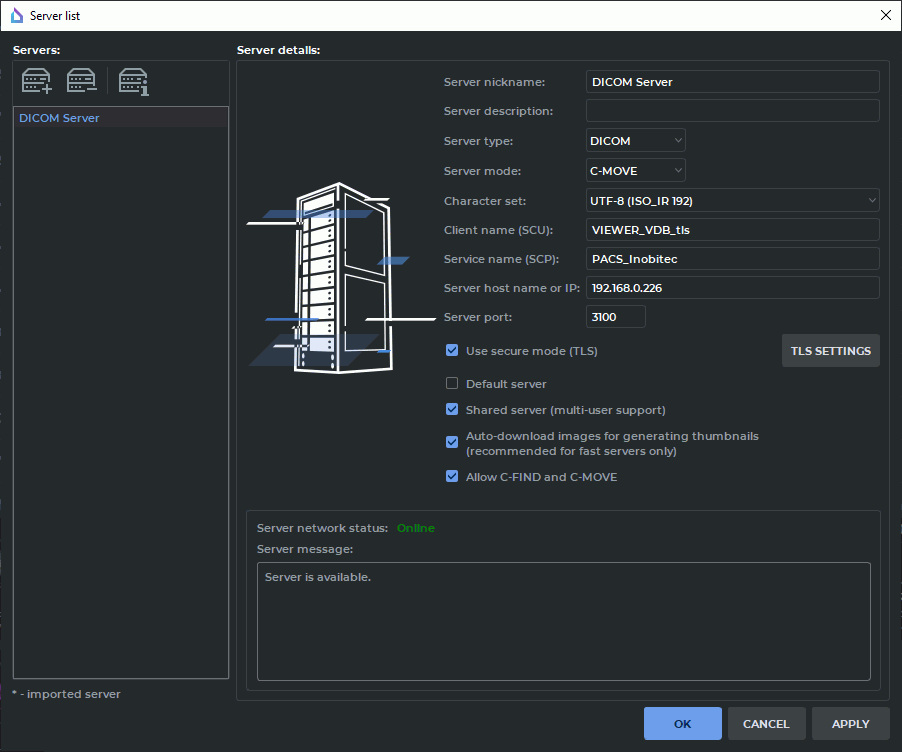
To open the window to connect to PACS servers, select the Network menu and the Server list item or press Ctrl+S (or command+S for macOS). The dialog box shown in Fig. 13.7 will pop up.
The DICOM Viewer allows you to download several series from the PACS server at the same time, making several parallel connections to the PACS Server. However, not all PACS Servers support a large number of simultaneous connections, and this leads to errors when downloading data. Setting the maximum number of connections is described in 16.7.5. This setting applies to all PACS Servers.
13.2.1 Add PACS Server
To add a new PACS server:
-
Click the
 button.
-
Enter the server name in the Server nickname field.
-
Enter a comment in the Server description field. This field may be left blank.
-
Select DICOM from the Server type dropdown menu.
-
Select the target mode from the Server mode dropdown menu.
-
Select the server character set from the Character set dropdown menu.
-
In the Client name (SCU) field, enter the value specified in Section 13.1.1 in the AE Title field.
-
In the Service name (SCP) field, enter the name of the server that the PACS server is installed on.
-
In the Server host name or IP field, enter the server name or IP address.
-
In the Server port field, enter the server port to accept connections by the DICOM protocol.
-
To establish a secure connection, check the Use secure mode (TLS) box. For details see Section 13.2.3.
-
To save the information without closing the window, click OK.
-
To save the information and close the window, click SAVE.
-
To close the window without saving the changes, click CANCEL.
The required information can be obtained from your system administrator. Other PACS servers are added in a similar way.
If you have several servers on your list, you can assign a server that will be active by default when starting the DICOM Viewer. To do this, check the Default server box in the server connection settings.
If another default server is already assigned, its box will be unchecked when you assign a new server.
If this server is also a client in relation to the DICOM Viewer, it is necessary to allow it to exchange data. To do this, check the box Allow C-FIND and C-MOVE. Configure the client application in accordance with the User Manual of this application. The connection configuration of two "Inobitec DICOM Viewer" applications is described in section 13.2.5.
To make the server available to all the users, you need to check the Shared server (multi-user support) box for this server. To do that, you need to run the DICOM Vieweras an administrator. Otherwise the box will be inactive. The users that do not have the administrator privileges cannot change the public server settings or delete it.
To delete a server from the list, click the  button.
 | Attention! After you click this button, the deletion cannot be undone. |
13.2.2 Downloading Data from the PACS Server via WADO service
The DICOM Viewer provides an opportunity to download studies and separate series from the PACS server via WADO web service. Studies at the PACS server are found with command C-FIND.
To enable access to the PACS server via WADO service, in the PACS server connection dialog box (Fig. 13.7) choose WADO-RS from the Server mode drop-down list. When choosing the WADO-RS mode, you will see the WADO settings dialog box (Fig. 13.8).
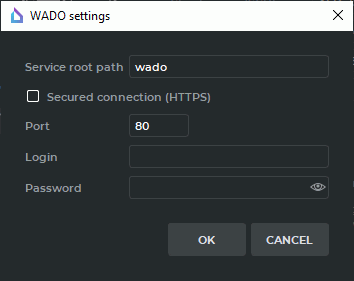
Set up the connection:
-
in the Service root path field, provide the path to the PACS server internal service processing WADO-RS queries. The field is empty by default;
-
the Secured connection (HTTPS) box is used to enable/disable the https protocol for communication with the PACS server when downloading data via WADO service. The box is unchecked by default. If the box is checked, the https protocol is used to communicate with the PACS server; if it is unchecked, the http protocol is used;
-
in the Port field, provide the value of the http or the https port (depending on the Secured connection (HTTPS) box status) within the range from 1 to 65535. The default value is 80. If an invalid value is entered, the OK button will be blocked;
-
in the Login and Password fields, provide the data to connect to the PACS server. The fields are empty by default.
Click OK to apply the changes or CANCEL to cancel.
To change the current WADO service connection parameters, click the SETTINGS button next to the Server mode drop-down list in the Server list dialog box (see Fig. 13.7).
WADO service settings may be exported and imported (see Section 16.9). The data to connect to the PACS server (login and password) are not saved when the settings are exported.
13.2.3 Secure PACS Server connection via the TLS protocol
| | If you launch the DICOM Viewer 2.4 or an inferior version of the program on your PC, all the TLS parameters will be reset. |
By default, the AE Title of the secure connection via the TLS protocol is the same as the AE Title of the non-secure connection. Hence, it is recommended to change the name in the settings window. The secure TLS connection service and the non-secure connection may be used simultaneously by different ports.
To enable the secure connection mode, check the Use secure mode (TLS) box in the server parameters dialog box (see Figure 13.7). By doing this, you will activate the TLS SETTINGS button for secure mode setup.
The TLS SETTINGS dialog box is shown in Figure 13.9.
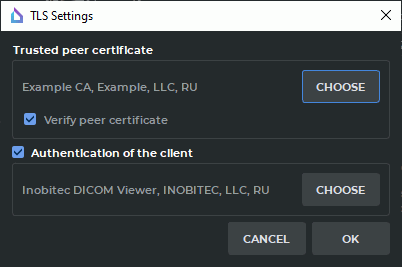
To add a trusted peer certificate, click CHOOSE. In the dialog box that pops up, choose the trusted (root) PACS Server certificate file. The trusted (root) PACS Server certificate file must have (pem), (crt), or (cer) extension.
In our example, the root certificate file "root_Example.crt" is being added.
To enable verification of the trusted (root) certificate at the time of establishing a connection with the PACS Server, check the Verify peer certificate box. In this case, when a connection is being established, the client’s authentication is performed. For successful authentication, the PACS Server certificate has to be signed by a trusted certificate.
The program automatically checks the presence of a valid certificate in the file. If the file is damaged or does not contain a certificate, a message will pop up.
If you have chosen the file containing the valid certificate, you will see the following information in the Trusted peer certificate box: <Certificate name>,<Company name>, <Country abbreviation>.
If the peer certificate verification mode has been enabled on the PACS Server, the client’s authentication must be performed to establish a connection. Check the Authentication of the client box and click CHOOSE.
In the Certificate and private key dialog box (Figure 13.10), the paths to the public key certificate file and the private key file are provided.
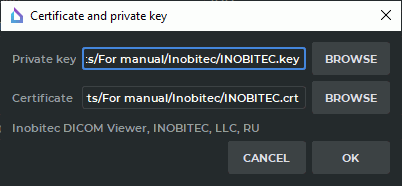
To provide the paths to the public key certificate file and the private key file, click BROWSE. In the box that pops up, choose the files you need. The public key certificate file must have (pem), (crt), or (cer) extension. The private key file must have (key) extension.
In our example shown in Figure 13.10, we have added the paths to the client’s private key file "INOBITEC.key" and the public key certificate file "INOBITEC.crt".
In the lower part of the Certificate and private key dialog box, you see the verification status of the public key certificate and the private key. Here are the possible variants of the verification status:
-
No certificate — the path to the public key certificate file has not been provided.
-
No private key — the path to the private key file has not been provided.
-
Incorrect certificate — the path provided is invalid / the file for which the path has been provided does not exist / the file for which the path has been provided is damaged or does not contain a valid public key certificate.
-
Incorrect private key — the path provided is invalid / the file for which the path has been provided does not exist / the file for which the path has been provided is damaged.
-
Data in the following format: <Certificate name>, <Company name>,
<Country abbreviation> — the public key certificate and the private key provided is valid.
| | Attention! You cannot check the compatibility of the public key certificate file with the private key in the Certificate and private key dialog box. |
The OK button will be activated after you provide the valid paths to the public key certificate file and the private key file. Click OK to apply the settings or CANCEL to cancel.
13.2.4 Check PACS Server Availability
To check if the server is available, click the  button in the PACS server connection window. If
the server is available, the system will return the following message: Server network status:
Online.
button in the PACS server connection window. If
the server is available, the system will return the following message: Server network status:
Online.
Otherwise the following message will be returned: Server network status: Offline.The error details will be displayed below.
Server is unavailable.
Connection request failed.
Failed to establish association
0006:0317 Peer aborted Association (or never connected)
0006:031c TCP Initialization Error: No error
If a message similar to the one shown below appears, it, most likely, means that the Server host name or IP or Server port fields are filled in incorrectly, or the target PACS server is not running.
13.2.5 Configuring the connection of two applications Inobitec DICOM Viewer
For example, the DICOM Viewer #1 takes on the role of a PACS-server and DICOM Viewer #2 takes on the role of a client.
A device with the DICOM Viewer #1 has the following parameters:
-
AE Title: VIEWER-SERVER;
-
Host IP address: 192.168.1.101;
-
Port: 3001.
A device with the DICOM Viewer #2 has the following parameters:
-
AE Title: VIEWER-CLIENT;
-
Host IP address: 192.168.1.102;
-
Port: 3002.
To configure the server:
-
Enable and set up the DICOM service (section 13.1.1), set AE Title as VIEWER-SERVER, set Port as 3001.
-
Add a client in the Set Up PACS Server Connection window (section 13.2.1). Set the following parameters for the fields:
-
for field Server type — DICOM;
-
for field Server mode — C-MOVE;
-
for field Client name (SCU) — VIEWER-SERVER;
-
for field Service name (SCP) — VIEWER-CLIENT;
-
for field Server host name or IP — 192.168.1.102;
-
for field Server port — 3002;
-
check the box Allow C-FIND and C-MOVE.
Now, DICOM Viewer #1 is ready to accept incoming connections from the client with the AE Title = VIEWER-CLIENT, IP = 192.168.1.102 and port=3002.
-
To set up a client:
Add the server in the Set Up PACS Server Connection window(section 13.2.1). Set the following parameters for the fields:
-
for field Server type — DICOM;
-
for field Server mode — C-MOVE;
-
for field Client name (SCU) — VIEWER-CLIENT;
-
for field Service name (SCP) — VIEWER-SERVER;
-
for field Server host name or IP — 192.168.1.101;
-
for field Server port — 3001;
Now DICOM Viewer #2 is ready to connect to the server with AE Title = VIEWER-SERVER, IP = 192.168.0.101 and port=3001.
If you enable and set up the DICOM-service and check the box Allow C-FIND and C-MOVE for the VIEWER-SERVER server in the DICOM Viewer #2 settings, then DICOM Viewer #2 will be able to take on the role of a server and DICOM Viewer #1 will be able to take on the role of a client. Thus, the DICOM Viewer can take on the role of a client and a server simultaneously.