2.22. Image Stitching
____________________________________________________________________________________________
Functionality is available in the Pro edition
____________________________________________________________________________________________
If a study or several studies contain series obtained as a result of scanning different segments of a single longer area, these multiple images can be combined in the image stitching mode. The result of image stitching can be exported to the current study, as well as to a new series or file (see Section 2.22.7). It can also be printed (see Section 2.22.8).
The stitching option is only available for images meeting the following criteria:
-
monochrome image. The permissible values of the PhotometricInterpretation (0028, 0004) tag are MONOCHROME1 or MONOCHROME2;
-
square pixel image. The ratio of pixel side dimensions is determined by the values of the PixelSpacing (0028,0030) or ImagerPixelSpacing (0018,1164) tags. If the pixel side dimensions are not specified in the tags, the pixel is considered to be square.
2.22.1 Opening a Series in the Image Stitching Mode
____________________________________________________________________________________________
Functionality is available in the Pro edition
____________________________________________________________________________________________
To open a series in the image stitching mode, proceed as follows:
-
Open the respective series in the flat image viewer tab (see Section 2.1).
-
Open the series with the images to be stitched. If you need to stitch images from series related to different studies, add these series to the current tab. To do that, go to the tab with the study list, select the respective study and drag the series related to this study to the open Image viewer tab stub. The series for the selected study will be added to the series panel for the current tab.
-
Select the window with the series that will be used as the first (basic) image. It is recommended to choose the first image that will be placed in the center of the stitched image and will overlap with as many other images as possible. Go to the respective image from the selected series (see Section 2.7).
-
On the main Image menu, select the
 Image stitching option or press the
Ctrl+Shift+X key combination (Command+Shift+X for macOS).
Image stitching option or press the
Ctrl+Shift+X key combination (Command+Shift+X for macOS).
 | Activation of the Image stitching mode leads to deactivation of Perfusion, Flow analysis or Image annotation modes that were active before. |
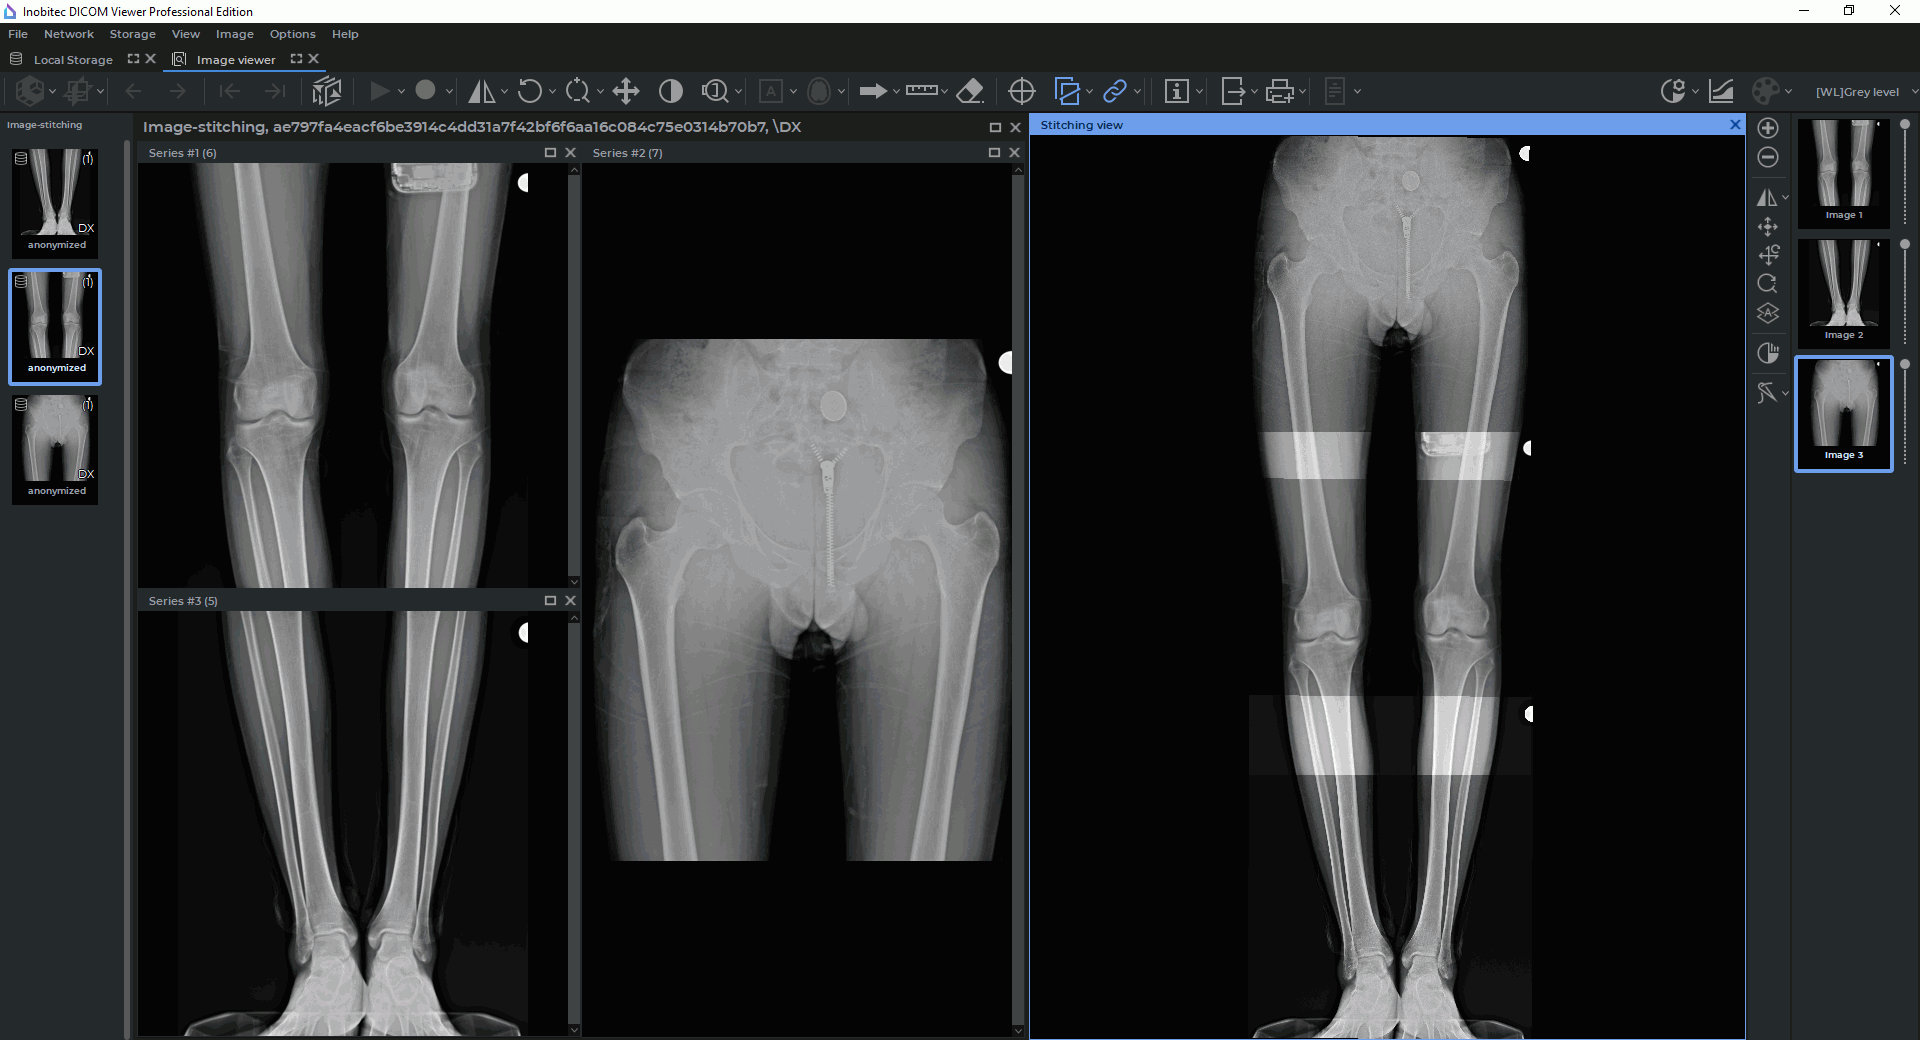
On the right-hand side of the Image viewer tab, the Stitching view window and the image stitching functional toolbar (see Fig. 2.67) will appear. The image from the selected window is automatically added to the Stitching view window. If several images of the series are displayed in the series window, the first image will be added to the Stitching view window.
There are several ways to exit the Image stitching mode:
-
on the main Image menu, select the
Image stitching option once again;
-
press the Ctrl+Shift+X key combination (Command+Shift+X for macOS);
-
close the Stitching view window.
If you exit the Image stitching mode, the Stitching view window and the image stitching functional toolbar are closed without saving the stitching results.
2.22.2 Image Stitching Functional Toolbar
____________________________________________________________________________________________
Functionality is available in the Pro edition
____________________________________________________________________________________________
The image stitching functional toolbar is placed on the right-hand side of the Image viewer tab (Fig. 2.67) and contains:
-
the Stitching view window where images added for stitching or stitching results are displayed;
-
a vertical toolbar for working with images in the Stitching view window;
-
a panel with the list of images added for stitching. The images added to the Stitching view window are shown on the list as thumbnails. The order in which the images were added to the Stitching view window is shown on the thumbnails in the form of numbers. Next to each thumbnail in the Stitching view window, there is an opacity slider for the respective image.
Tools on the image stitching functional toolbar:
 | The Add image button adds images from the selected series window to the Stitching view window and to the list of images on the stitching panel |
 | The Remove selected images button removes selected images from the Stitching view window and from the list of images on the stitching panel |
 | The Flip horizontally button flips the image selected on the stitching list in the horizontal plane |
 | The Flip vertically button flips the image selected on the stitching list in the vertical plane |
 | The Manual image fusion button is used for moving, scaling, and rotating images in the Stitching view window (see Section 2.22.4) |
 | The Reset all transformations button resets all the transformations for the selected images in the Stitching view window |
 | The Reset zoom button resets the scaling changes for the selected images in the Stitching view window |
 | The Merge image automatically button automatically merges the image selected on the list of images on the stitching panel with other images (see Section 2.22.5) |
 | The Recalculate intensities by W/L button sets the same intensity range for all the images in the Stitching view window. It is recommended to use this tool for stitching images with different intensity ranges |
| | The Stitching mode button enables the stitching of images added to the Stitching view window (see Section 2.22.6) |
The user may assign a hotkey to each tool on the image stitching functional toolbar (see Section 16.8).
2.22.3 Adding Images for Stitching
____________________________________________________________________________________________
Functionality is available in the Pro edition
____________________________________________________________________________________________
To add images to the Stitching view window, proceed as follows:
-
Open the respective series in the flat image viewer tab, activate the Image stitching mode (see Section 2.22.1).
-
Select the window with the series containing the image to be stitched with the basic image. Select the image (see Section 2.7).
-
Add the selected image by one of the following methods:
-
click the Add image
button on the image stitching toolbar;
-
mouse over an image in the selected series window and drag it to the Stitching view window while holding the left mouse button.
-
| | The value of the "PhotometricInterpretation" tag for the image added to the Stitching view window must be the same as the value of the "PhotometricInterpretation" tag for the first Image. |
If the pixels of the images are all square, but their sizes are different, a message will pop up notifying the user of this problem. The images will be added to the Stitching view window. For the stitching function availability criteria, see Section 2.22.
The image from the selected series window will be added to the Stitching view window. A thumbnail for the image will be added to the list of images on the stitching panel.
To delete an image from the Stitching view window, select the image thumbnail and click the
Remove selected images button on the toolbar. The selected image will be
deleted from the Stitching view window and from the list of images on the stitching
panel.
| | The first (basic) image cannot be deleted from the Stitching view window. |
2.22.4 Merging Images Manually
____________________________________________________________________________________________
Functionality is available in the Pro edition
____________________________________________________________________________________________
To merge images manually, proceed as follows:
-
From the list of images on the stitching panel, select the thumbnail of the image to be merged with the first (basic) image in the Stitching view window.
-
Click the Manual image fusion
button with the left, right, or middle mouse
button. To continue work with the tool, use the same button you used to activate it. For
details on tool management, see Section 1.14.
-
Merge the selected image with the basic image in the Stitching view window. To do that, proceed as follows:
-
drag the selected image while holding the mouse button that was used for activating the tool;
-
rotate the image while holding the Alt key (or the Option key for macOS) and the mouse button which was used for activating the tool;
-
zoom the image while holding the Ctrl key (or the Command key for macOS) and the mouse button that was used for activating the tool.
You cannot change the position, scale, or orientation of the first (basic) image. -
-
To cancel all the transformations for the selected image, click the Reset all transformations
button.
-
To cancel scaling for the selected image, click the Reset zoom
button.
After the images have been merged, stitch them by clicking the Stitching mode button on
the image stitching functional toolbar (see Section 2.22.6).
2.22.5 Merging Images Automatically
____________________________________________________________________________________________
Functionality is available in the Pro edition
____________________________________________________________________________________________
To merge images automatically, proceed as follows:
-
From the list of images on the stitching panel, select the thumbnail of the image to be merged with the first (basic) image in the Stitching view window.
-
Click the Merge image automatically
button on the image stitching functional
toolbar.
| | The automatic fusion function is not available for the first (basic) image. |
Automatic fusion can be performed inaccurately. For better result, move the selected image closer to the place of fusion (see Section 2.22.4), and then use the automatic fusion function.
After all the images have been merged, stitch them by clicking the Stitching mode button
on the image stitching functional toolbar (see Section 2.22.6).
2.22.6 Stitching Merged Images
____________________________________________________________________________________________
Functionality is available in the Pro edition
____________________________________________________________________________________________
Stitching provides an opportunity to combine several images in a single panorama. To use the stitching mode, proceed as follows:
-
Merge the images in the Stitching view window manually (see Section 2.22.4) or automatically (see Section 2.22.5).
-
Click the arrow on the Stitching mode
button on the image stitching functional toolbar
and select one of the stitching options. The selected stitching option will be used by default each
time you click the Stitching mode button.
-
Cut overlapped. The intensity value in the area of overlap is set equal to the intensity value of the image whose position number is smaller. This option is checked by default as the default stitching option;
-
Mix overlapped. The intensity value in the area of overlap is set as the mean intensity value for all the overlapping images.
-
-
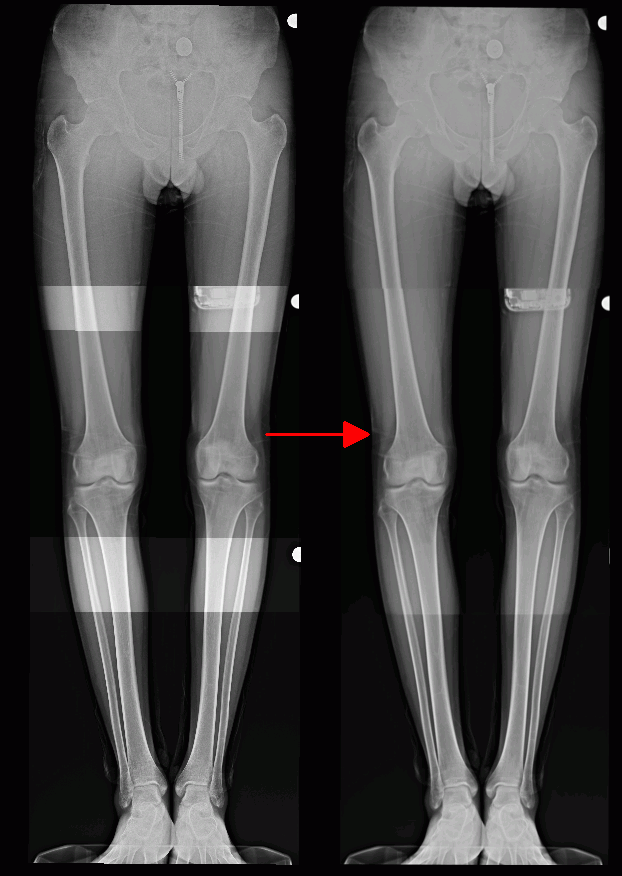
Click the Stitching mode
button on the image stitching functional toolbar. The image
in the Stitching view window will look similar to Fig. 2.68 (on the left, you can see the
merged images before stitching, on the right — after stitching).
When the stitching mode is activated (the Stitching mode button on the image stitching
functional toolbar is highlighted), the opacity settings are reset and the image opacity sliders are
locked.
2.22.7 Exporting Stitching Results
____________________________________________________________________________________________
Functionality is available in the Pro edition
____________________________________________________________________________________________
Stitching results can be exported to the current study, to a new series, or to a file with .png or .jpg extension in a given directory (see Section 2.28).
Before exporting stitching results, select the Stitching view window and activate the stitching
mode by clicking the Stitching mode button on the image stitching functional
toolbar.
2.22.8 Printing the Image Stitching Results
____________________________________________________________________________________________
Functionality is available in the Pro edition
____________________________________________________________________________________________
The DICOM Viewer provides an opportunity to print image stitching results on both, paper and film (see Chapter 19).
Before adding stitching results to the print list, select the Stitching view window and activate
the stitching mode by clicking the Stitching mode button on the image stitching functional
toolbar.