2.37. Calibration sizes
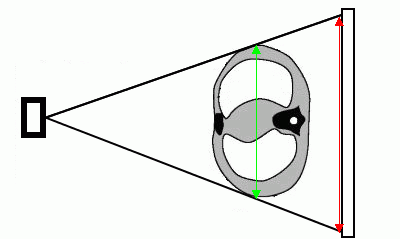
X-ray image sizes are increased as compared with the real size of the tissues (Fig. 2.101).
Hence, the size determined by X-ray modality may be incorrect. If a picture contains an object whose size is known (e.g., a catheter), it is possible to calibrate the image size. To calibrate the size:
-
Select the Images main menu and the Calibration tool.
-
A calibration segment can be built in two ways:
-
Mark the first point by clicking the left mouse button. Drag the cursor over the screen. The distance from the first point to the current point will be displayed beside the line. To fix the second point, click the left mouse button.
-
Click the mouse button at the first point of the calibration segment and move the cursor to the endpoint while holding the mouse button. The distance from the first point to the current point will be displayed beside the line. To fix the endpoint, release the mouse button.
-
-
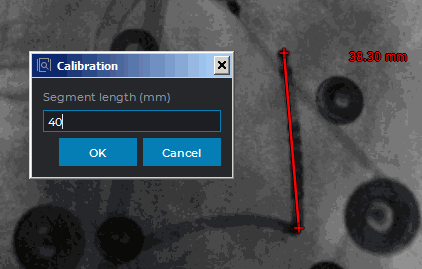
In the dialog box that appears, type the real length of the interval constructed (Fig. 2.102). To calibrate the size, click OK, to calcel, click Cancel.
If you cancel the calibration, the calibration interval remains in the image. To hide the calibration interval, put the cursor on it and press the Delete key on the keyboard, or right-click the mouse and select the Remove object item on the context menu. This calibration will remain.
To deactivate the Calibration tool, select it again in the Image main menu. This calibration will remain.
Calibration is factored in for measurements that depend on linear dimensions. After calibration, previously made measurements are automatically adjusted.
Calibration is maintained until the window containing the current series is open.