13.1. Services
13.1.1 DICOM Service (PACS Server functionality)
The DICOM Viewer can take on the role of a PACS server. The data in the Local Storage will be available for clients. To do this, enable and set up the DICOM Service and add clients to the PACS Servers list (section 13.2).
Select the Services... item from the Network menu. In the drop-down menu, choose the DICOM Listener... option. The dialog box shown in Fig. 13.1 will pop up.
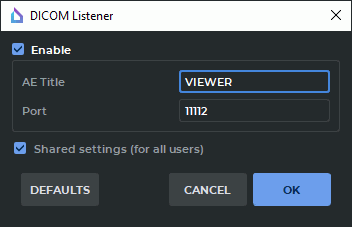
To set up the DICOM Listener Service:
-
Check the Enable box.
-
In the AE Title field, enter a user-defined title for the computer that the is installed on to identify it on the server. The length of AE Title value shall not exceed 16 characters. Cyrillic letters and "\" symbols in AE titles are not allowed.
-
In the Port field, specify any free port of the computer the DICOM Viewer is installed on. If you are not sure which value to specify, use the default value. This information can be obtained from your system administrator.
-
To restore the service default settings, click DEFAULTS.
-
To save the current settings for all the users of this PC, check the Shared settings (for all users) box. It can only be done if the DICOM Viewer was launched by a user with administrator privileges. The users who do not have administrator privileges cannot check or uncheck this box. In such a case an error message will pop up.
-
Click OK to apply the settings or CANCEL to cancel. If the port is busy, the message Dicom Listener cannot be run. Error message: The address is protected will pop up. In this case, select another port and repeat the previous action.
13.1.2 HIS/HTTP Service
This service is used to manage the DICOM Viewer using the http protocol. Select the Services... item from the Network menu. In the drop-down menu, choose the HIS/HTTP Service... option.The dialog box shown in Fig. 13.2 will pop up.
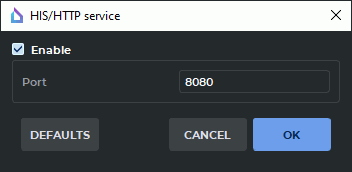
To set up the HIS/HTTP Service:
-
Check the Enable box.
-
In the Port field under the Enable checkbox, specify any free port of the computer the DICOM Viewer is installed on. If you are not sure which value to specify, use the default value. The default port number is 8080. This information can be obtained from your system administrator.
-
To restore the default settings, click DEFAULTS. By default, the Enable box is unchecked, and port 8080 is used.
-
Click OK to apply the settings or CANCEL to cancel. If the port is busy, the message will pop up. In this case, select another port and repeat the previous action.
13.1.3 Web Access
____________________________________________________________________________________________
Functionality is available in the Pro edition
____________________________________________________________________________________________
Select the Services... item from the Network menu. In the drop-down menu, choose the Web Service... option.The dialog box shown in Fig. 13.3 will pop up.
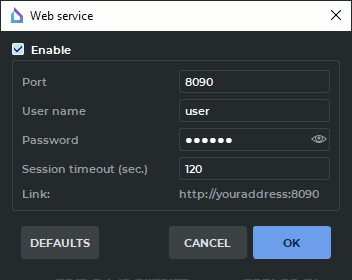
To set up the Web access:
-
Check the Enable box.
-
In the Port field under the Enable web Access checkbox, specify any free port of the computer the DICOM Viewer is installed on. If you are not sure which value to specify, use the default value. The default port number is 8090. For access from other computers, add the web access port to your firewall exceptions. If necessary, contact your system administrator.
-
In the User name field, enter the user name.
-
In the Password field, enter the user password.
-
In the Session timeout (sec.) field, enter a timeout after which the session is terminated if the connection is lost. When the connection is restored, you need to enter your username and password again.
-
To restore the default settings, click DEFAULTS. By default, the Enable box is unchecked, and port 8090 is used.
-
Click OK to apply the settings or CANCEL to cancel.
At the bottom of the dialog, there is a link that must be entered into the browser for web access to the DICOM Viewer http://youraddress:<port>, where instead of youraddress you need to type in the ip address or the computer name on which the DICOM Viewer is installed.
13.1.4 Secure DICOM Listener Service
The secure DICOM listener service provides for secure data transfer over the net using the TLS protocol.
The secure DICOM listener service and the open DICOM listener service may be used simultaneously by different ports.
Select the Services... item from the Network menu. In the drop-down menu, choose the Secure DICOM Listner... option. The dialog box shown in Fig. 13.4 will pop up.
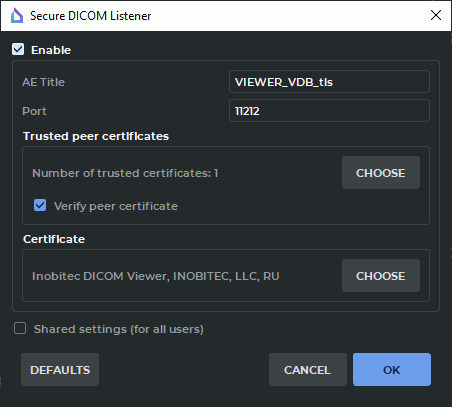
To set up the Secure DICOM Listner Service:
-
To enable the secure DICOM listener service, check the Enable box.
-
In the AE Title field, print an arbitrary name of the computer with the DICOM Viewer installed for identification on the server. The length of AE Title value shall not exceed 16 characters. Cyrillic letters and "\" symbols in AE titles are not allowed.
-
In the Port field, specify any unoccupied port of the computer with the DICOM Viewer installed. The port number must be different from the values stated for other services (such as Web Service, HIS/HTTP Service, DICOM Listener Service). The default port number is 3100.
-
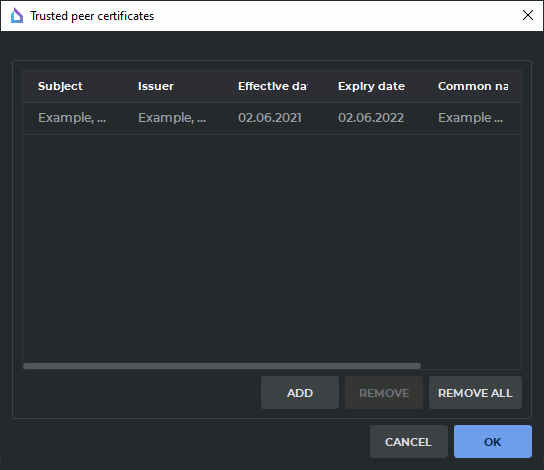
In the Trusted peer certificates, a list of trusted (root) certificates for the DICOM service is created. By default, the list is empty.
A trusted certificate (root certificate) is a public key certificate which is used to sign the peer certificate. It is used to confirm the identity of the peer (the unit on the other end of the line).
To create a list of trusted certificates, click the CHOOSE button. In the Trusted peer certificates dialog box (Figure 13.5), the list of trusted certificates is provided.
To add a certificate, click ADD. In the dialog box that pops up, choose the certificate file. Certificate files must have (pem), (crt), or (cer) extension.
In Figure 13.5, you see that the file "root_Example.crt" is added to the trusted certificates list. It is the server root certificate.
If the certificate you are trying to add has already been added to the list, an error message will pop up.
To delete a certificate from the list, highlight the respective line and click REMOVE. To delete all the trusted certificates, click REMOVE ALL.
Click OK to apply the settings or CANCEL to cancel.
The trusted certificates added to the list are saved in the OS registry or in the configuration file as binary data. After the settings are saved, there is no need to keep the certificate files on the disk.
To enable verification of the certificates of the clients connected, check the Verify peer certificate box. In this case, when a secure connection to the DICOM service is established, authentication of the client is performed. For successful authentication, the client’s certificate has to be signed by one of the trusted DICOM Service certificates. If the Verify peer certificate box is not checked, the secure DICOM Service accepts any client connections.
-
In the Certificate box, the paths to the public key certificate files and DICOM listener service private key files are to be provided. By default, these paths are not provided.
A public key certificate is an electronic document containing the public key, the information about the key owner and its intended use. The certificate is signed by the certification authority having issued the key and proves that the public key belongs to its owner.
The public key is available to anyone. It is used to encrypt data when the client establishes a connection with the server.
The private key is kept at the server. It is used to decrypt data received from the client.
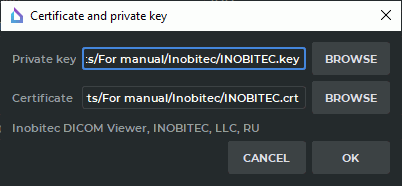
To provide the paths to the public key certificate file and the private key file, click CHOOSE.
To provide the paths to the public key certificate file and the private key file, click BROWSE in the Certificate and private key dialog box (see Figure 13.6). In the box that pops up, choose the files you need. The public key certificate file must have (pem), (crt), or (cer) extension. The private key file must have (key) extension.
In our example shown in Figure 13.6, we have added the paths to the client’s private key file "INOBITEC.key" and the public key certificate file "INOBITEC.crt".
In the lower part of the Certificate and private key dialog box, you see the verification status of the public key certificate and the private key. Here are the possible variants of the verification status:
-
No certificate — the path to the public key certificate file has not been provided.
-
No private key — the path to the private key file has not been provided.
-
Incorrect certificate — the path provided is invalid / the file for which the path has been provided does not exist / the file for which the path has been provided is damaged or does not contain a valid public key certificate.
-
Incorrect private key — the path provided is invalid / the file for which the path has been provided does not exist / the file for which the path has been provided is damaged.
-
Data in the following format: <Certificate name>, <Company name>, <Country abbreviation> — the public key certificate and the private key provided is valid.

Attention! You cannot check the compatibility of the public key certificate file with the private key in the Certificate and private key dialog box. The OK button will be activated after you provide the valid paths to the public key certificate file and the private key file. Click OK to apply the settings or CANCEL to cancel.
-
-
To save the current settings for all the users of this PC, check the Shared settings (for all users) box. It can only be done if the DICOM Viewer was launched by a user with administrator privileges. The users who do not have administrator privileges cannot check or uncheck this box. In such a case an error message will pop up.
-
To restore the default settings, click DEFAULTS.
-
Click OK to apply the settings or CANCEL to cancel.