6.11. Saving and Opening Segmentation Projects and DTI Projects
____________________________________________________________________________________________
Functionality is available in a separate module which is activated in the Pro edition for an extra fee
____________________________________________________________________________________________
The DICOM Viewer allows for saving segmentation projects and DTI projects in a file. One project may contain structures and DTI data from different series, as well as source DICOM data. If a project was saved without source DICOM data, it cannot be opened without downloading the corresponding series first.
Save segmentation project to file  and Open segmentation project from file
  buttons (shown with the red frame in Fig. 6.34) are located on the segmented structures
panel.
buttons (shown with the red frame in Fig. 6.34) are located on the segmented structures
panel.

6.11.1 Saving a Project
____________________________________________________________________________________________
Functionality is available in a separate module which is activated in the Pro edition for an extra fee
____________________________________________________________________________________________
To enable/disable the saving of source DICOM data, on the main menu, select Options->Settings...->Modules->3D reconstruction, then choose the Project tab and check/uncheck the Save DICOM data of series box. This option is activated by default.
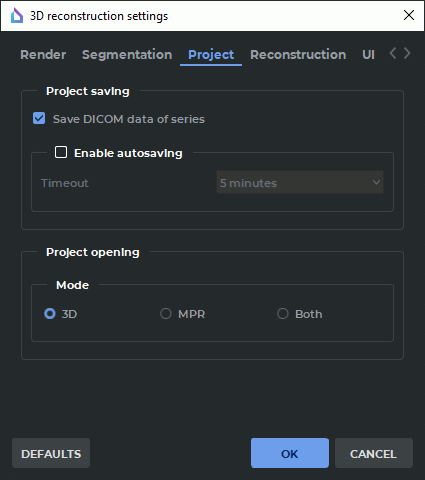
The DEFAULTS button restores the checkbox Save DICOM data of series.
Click OK to apply the settings or CANCEL to cancel.
To save a project, click the Save segmentation project to file button on
the segmented structures panel. In the dialog box that pops up, provide the path to the
file and the file name. Click OK to save or Cancel to cancel. The project file has (spj)
extension.
When a project is saved, the data regarding the visibility and minimization status of all the elements on the segmentation panel list, as well as the data regarding the model orientation and projection are saved. When the project is opened again, the visibility and minimization status of the elements on the segmentation panel list, as well as the model orientation and projection will be restored. If you open a project created by a user of the DICOM Viewer 2.14 or inferior, the status of the elements on the segmentation panel list will be determined in compliance with the status of the Collapse new structure on creation setting which can be found on the Segmentation tab, 3D Reconstruction module settings (see Section 16.7.3).
If the project is opened in the MPR reconstruction tab, the following characteristics are restored:
-
cutting planes turn and arrangement;
-
model position;
-
model scale.
The turn of the model slice in the MPR reconstruction tab is not restored.
If the project is opened in the Volume reconstruction tab or in the 3D view window of the MPR reconstruction tab, the following characteristics are restored:
-
model turn;
-
model position;
-
model scale;
-
projection type.
If the project was saved in the MPR reconstruction tab and opened in the Volume reconstruction tab, the parameters that can be applied only to the 3D view window are restored.
The markers — Marker, Line marker, or Polygonal line marker — are saved in the project for each layer. The length and angle measurements performed with polygonal marker lines are saved in the project file. The work with markers is described in Section 5.12.
6.11.2 Saving Projects Automatically
____________________________________________________________________________________________
Functionality is available in a separate module which is activated in the Pro edition for an extra fee
____________________________________________________________________________________________
Segmentation projects are saved automatically to prevent loss of data as a result of a program crash caused by a technical failure or the user’s actions. Autosave and data recovery are available in MPR reconstruction and Volume reconstruction tabs.
If the license for the extended segmentation module is active and it is the first time the user adds, deletes or edits
-
a segmented structure or base volume;
-
a surface for a segmented structure or base volume;
-
a group of ROI DTI, or individual ROI DTI;
-
a marker (except for segmented structure markers),
in the MPR reconstruction or Volume reconstruction tab, then a dialog box for segmentation projects autosave activation (Fig. 6.36) will pop up.
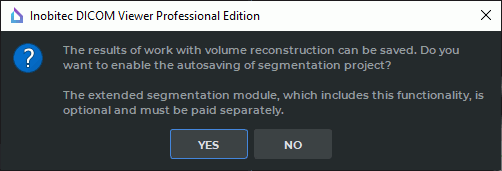
Click YES to enable segmentation projects autosave or NO to cancel.
To enable/disable segmentation projects autosave, on the main menu, select Options->Settings...->Modules->3D reconstruction, then choose the Project tab (Fig. 6.35) and check/uncheck the Enable autosaving box. By default, segmentation projects autosave is disabled. On the Timeout dropdown list, select autosave frequency. The default value is five minutes.
 | Autosave option is available only when the extended segmentation module is activated. If the extended segmentation module is not activated, the Enable autosaving option is automatically disabled. |
Segmentation projects are automatically saved in the background mode without blocking the interface. Autosave frequency may be selected on the Timeout dropdown list.
When a segmentation project is saved automatically, a file with .autospj extension is created in a temporary system folder. This file contains:
-
segmentation results;
-
visibility status of structures on the segmentation panel list:
-
base volume visibility is saved as visibility of a separate structure;
-
3D model visibility is saved as visibility of a structure mask;
-
-
collapsed status of elements on the segmentation panel list, including:
-
nested elements of the mask and the surface;
-
base volume elements which are saved as separate structures;
-
-
DICOM data source information.
The DICOM data source may be:
-
a local storage;
-
a folder with DCM files;
-
a DICOMDIR file;
-
an XML file;
-
a third-party SPJ file;
-
an archive with DCM files.
The data concerning the changes in the base volume in different tabs working with the current segmentation project are saved as separate segmented structures. If the user works with the same segmentation project in several MPR reconstruction or Volume reconstruction tabs, the data are automatically saved in the same file.
If a segmentation project is saved manually with the help of the Save segmentation project to
file button on the segmented structures panel (see Section 6.11.1), the .autospj file is deleted
automatically.
When the user closes the last tab of a segmentation project with unsaved changes, a dialog box for saving the project changes (Fig. 6.37) will pop up.

Click SAVE to save the changes in the project or DISCARD to close the tab without saving the changes. To resume work on the project, click CANCEL. After the project has been saved or the changes have been discarded, the .autospj file is deleted automatically.
6.11.3 Resuming Work with Segmentation Projects
____________________________________________________________________________________________
Functionality is available in a separate module which is activated in the Pro edition for an extra fee
____________________________________________________________________________________________
If the segmentation projects autosave option is enabled, an .autospj file is created and saved in a temporary folder.
The name of the .autospj file is generated as follows: <patient
name>_<description of the 1st layer series>_…_<description of the n layer series>_
<project #>_<time and date>.autospj, where <project #> — is the unique number
that is automatically assigned to a segmentation project for a series or a fused series,
and <time and date> — is the time and date of the file creation in hhmmssddMMyyyy format, where
"hh" stands for hours, "mm" — for minutes, "ss" — for seconds, "dd" — for the day, "MM" —
for the month, and "yyyy" — for the year.
The maximum length of the autospj file name is 100 characters. If this limit is exceeded, the
name will be cropped and a "∼" symbol will be placed before _<project #>_<time and
date>.
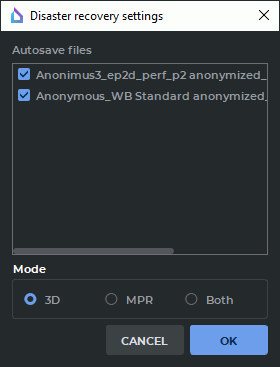
In case of the program crash, the project file is restored automatically when the DICOM Viewer is launched again. If there is an .autospj file in the temporary folder, it is decided that the project must be restored, and a dialog box for resuming work with the last autosaved version of the segmentation project pops up (Fig. 6.38).
In the Disaster recovery settings dialog box, check the autosaved files for the projects that have to be restored. If none of the files has been selected, the OK button is inactive. You can choose the mode in which the restored project will be opened: 3D, MPR or Both. Click OK to open the selected segmentation project in the mode specified or CANCEL to cancel.
If there are several projects, work with them will be resumed in the order in which .autospj files are listed in the Disaster recovery settings dialog box. If any of the projects cannot be restored, it does not affect the other projects.
When you renew work with an automatically saved file, the visibility and collapsed status of the structures on the segmentation panel list will depend on the status of these structures at the time of the .autospj file creation.
| | If you click CANCEL, .autospj files are deleted from the temporary folder. |
An .autospj file contains only the information on the third-party DICOM data source. If this source cannot be accessed, the segmentation project cannot be restored.
If the user cannot resume work with any of the segmentation projects as the DICOM data for the series are unavailable, a dialog box will pop up advising to save the data from the autosave file to a separate .spj file on the disk. After the user confirms that the data must be saved, a standard Save As dialog box pops up. The name of the file and its location are to be specified by the user.
| | After the file is saved or the user chooses not to save it, the .autospj file is deleted from the temporary folder. |
6.11.4 Opening a Project with Source DICOM Data
____________________________________________________________________________________________
Functionality is available in a separate module which is activated in the Pro edition for an extra fee
____________________________________________________________________________________________
When a project is opened, the DICOM Viewer shows it in the Volume Reconstruction or Multiplanar Reconstruction tab. To choose a default tab, on the main menu, select Options->Settings...->Modules->3D reconstruction, then choose the Project tab (Fig. 6.35), and choose the 3D, MPR or Both opening mode. The 3D mode is chosen by default.
The DEFAULTS button restores the checkbox Save DICOM data of series.
Click OK to apply the settings or CANCEL to cancel.
Orientation and projection data on the model are saved in the project. The orientation and projection of the model is restored when the project is opened. For more information, see Section 6.11.1.
There are three ways to open a project containing source DICOM data in the default tab:
-
Choose the Open project... option in the File menu. Select the project file in the window that pops up. Click Open to open the project or Cancel to cancel.
-
Double-click with the left mouse button on the project file in the Explorer window. This function is available by default only on Windows OS. On macOS and Linux, you have to use the system functions to create a link between (spj) format and the DICOM Viewer software.
-
Drag and drop the project file to the DICOM Viewer shortcut (this option is only available on Windows and macOS). If you drag and drop several project files to the DICOM Viewer shortcut, each file will be opened in a separate tab.
To open a part of the project and specify the tab in which it is to be opened, proceed as follows:
-
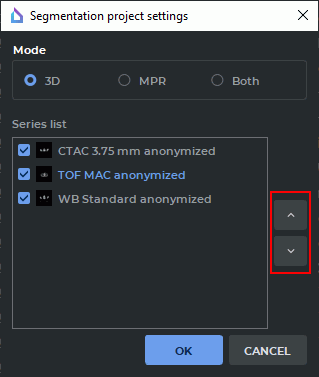
On the main menu, select File->Open project as.... A window will pop up, in which you will have to choose the file containing the project for this series. Click Open to open the project or Cancel to cancel the action. The dialog box shown in Fig. 6.39 will pop up.
-
Choose the tab in which you want to open the project (3D, MPR or Both). The selected mode will be set by default.
-
Select the series in the Series list box that need to be opened. By default, all series of the project are selected. Uncheck the box against the series if you don’t want it to be opened in the project.
-
The order in which the series are displayed is important for working with the project. By default, the series are displayed in the Series list in the same order as when the segmentation project was saved. To change the series order, highlight a series in the Series list box. Use
 Move up and
  Move down buttons (indicated by the red
frame in Fig. 6.39) to move the selected series up or down.
Move down buttons (indicated by the red
frame in Fig. 6.39) to move the selected series up or down.
-
Click OK to open the project or CANCEL to cancel the operation.
-
The first series on the Series list is considered to be the basic series.
-
The basic series on the MPR tab is displayed as the background layer behind the other layers. The background layer is fixed. The center of the background layer coincides with the center of the window. You can move the layers about the background layer or each other with the help of the tools you see on the Fusion of layers panel. The procedure of merging layers is described in Section 4.3.
-
The project opened in the volume reconstruction window is displayed as 3D models created independently of each other. The basic series of the project is displayed as a 3D model fixed at the point of origin which is at the same time the center of the model. The models from other series are located in space with respect to the first layer model. The change of the order of the layers at the time of opening the project does not affect the mutual arrangement of the models.
-
If the project does not contain any source DICOM data, when you attempt to open it, an error notification will pop up: Cannot find DICOM data in the project file. The procedure of opening projects without DICOM data is described in Section 6.11.5.
6.11.5 Opening a Project without Source DICOM Data
____________________________________________________________________________________________
Functionality is available in a separate module which is activated in the Pro edition for an extra fee
____________________________________________________________________________________________
To open a project without source DICOM data, you first need to open the source data in the Volume Reconstruction or Multiplanar Reconstruction tab.
To open a project that does not contain any source data:
-
Open the initial series for which the project was saved in the Volume Reconstruction or Multiplanar Reconstruction tab.
-
Open the segmented structure panel by clicking the
 button.
-
Click the Open segmentation project from file
button on the segmented
structure panel. A window will pop up, in which you will have to choose the file containing
the project for this series. Click Open to open the project or Cancel to cancel the
operation.
Orientation and projection data on the model are saved in the project. The orientation and projection of the model is restored when the project is opened. For more information see Section 6.11.1.
The segmented structures and DTI data for this series contained in the project are added to the segmented structure panel. When the project is opened for the second time, the data are added again without replacing the old data. When the structures are edited on the segmentation panel, the file contents are not changed. If a project file contains data for several series, only the data referred to the series that is currently open on the volume or multiplanar reconstruction tab will be added.