Show series scout lines tool is used if two or more series are opened for a particular
study. The tool allows you to display the series image scout lines in images from other series if they
are synchronized.
Show series scout lines tool is used if two or more series are opened for a particular
study. The tool allows you to display the series image scout lines in images from other series if they
are synchronized.
The Show series scout lines tool is used if two or more series are opened for a particular
study. The tool allows you to display the series image scout lines in images from other series if they
are synchronized.
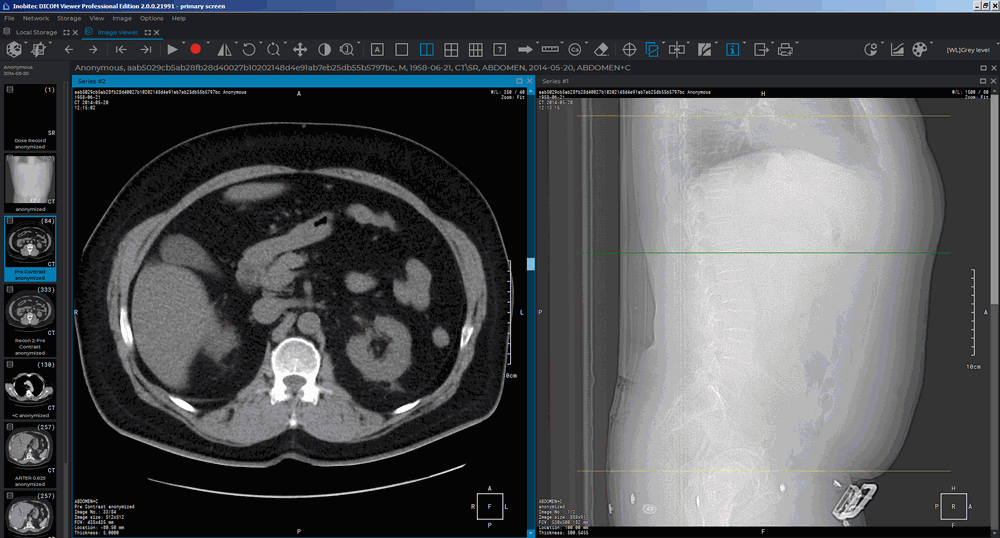
By default, the current image scoute line is highlighted in green, and the boundary scout lines are highlighted in yellow (Fig. 2.83). If the Show all scout lines mode is active, the intermediate scout lines are highlighted by a dotted line, and current and boundary scout lines are highlighted by solid lines.
The study series must have the same value of the FrameOfReferenceUID (0020,0052) tag. If study series have different values of FrameOfReferenceUID (0020,0052) tag, then the scout lines for these series are not displayed.
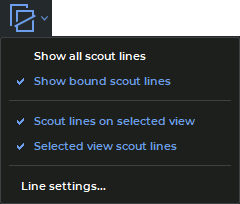
The Show series scout lines tool menu (Fig. 2.84) contains the following items:
Mode Show all scout lines shows the scout lines of all series images, not just of the current one.
The Show bound scout lines mode shows boundary scout lines in all the open windows. The mode is set by default.
Mode Scout lines on selected view shows in the current window scout lines of images opened in other windows.
Mode Selected view scout lines shows the scout lines of the current image in other windows.
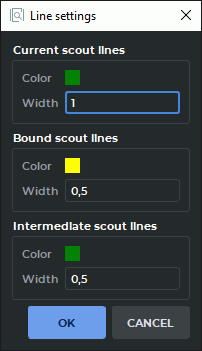
Line settings... opens the dialog to configure the scout lines settings (Fig. 2.85).
To activate/deactivate the mode of this tool, click on the arrow on the button and
check/uncheck the corresponding item.
The modes are activated independently.
By default, the Show series scout lines tool is active and the Selected view scout
lines mode is checked. To activate/deactivate the tool, click the button on the
toolbar.
To set the color and width og lines:
Click on the arrow on the button and select the Line settings... item. A dialog
box shown in Fig. 2.85 will be displayed.
Set the line color. To do this, click the color change button, select a color in the dialog box and click OK.
Set the line width.
Click OK to apply the changes or CANCEL to cancel the actions.