Open a series suitable for SUV measuring.
Select the Image main menu, select the SUV item and the Show SUV command. If the selected series is not suitable for SUV measuring, then the Show SUV command is disabled. If SUV measuring is already activated, then the Show SUV command is marked with a flag.
If necessary, change the CLUT to [WL]PET by selecting it from the drop-down list or by pressing the Shift+F8 key combination on the keyboard. For details, see Section 2.23.1.
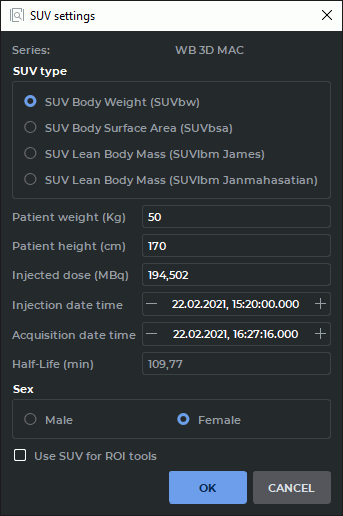
If the data contained in the study is insufficient, then the dialog shown in Fig. 2.79 appears. Specify the following data:
-
SUV Type. Choose one of four ways to measure SUV:
-
by body weight: SUV Body Weight (SUVbw);
(2.13) -
by body surface area: SUV Body Surface Area (SUVbsa);
(2.14) -
by the body mass index according to the James method: SUV Lean Body Mass (SUVlbm James); For men:
(2.15) For woman:
(2.16) -
by the body mass index according to the Janmahasatian method: SUV Lean Body Mass (SUVlbm Janmahasatian);
(2.17) (2.18) For men:
(2.19) For woman:
(2.20) -
by the body mass index according to the James (consensus) method: SUV Lean Body Mass SUVlbm James (consensus); For men:
(2.21) For woman:
(2.22)
-
-
Patient weight (Kg) (optional for the method of calculating by body surface area);
-
Patient height (cm);
-
Injected dose (MBq);
-
Injection date time;
-
Acquisition date time;
-
Half-life (min);
-
Sex (optional for the method of calculating by body weight and by body surface area);
-
if it is necessary to display the SUV measurement results for ROI tools then check the Use SUV for ROI tools box.
To measure the SUV, click OK, to cancel the operation, click CANCEL. If there is not enough data to calculate (for example, the patient‘s weight or height is not specified or is zero), then the OK button is disabled.
To change the SUV calculation settings, select the Image main menu, select the SUV item and the Settings... item.
When the SUV measurement is activated, the value at the point where the cursor
is located appears in the top left-hand corner of the window. For example:
SUVlbm: -0.092 g/ml. Move the cursor over the image to measure the SUV. Please note
that the Display information  button must be pressed (see Section 2.27).
To calculate the SUV in a particular area or point, use the ROI tools (see Section 2.19.7). Please note that the Use SUV for ROI box must be checked in the SUV settings.


